Support & Documentation
Blob Web Explorer
Blob Web Explorer is a cloud service that lets teams manage their Azure Blob Storage containers through a familiar web file explorer. It combines daily file operations, secure sharing, role-based permissions, and activity tracking in one workspace.
- Version: 3.0
- Author: ONERiC
- Created: 26 March, 2023
- Update: April, 2026
If this guide does not answer your question, contact our team via the Contact Page.
Features
Blob Web Explorer gives you a complete, web-based experience to manage Azure Blob Storage at scale:
Container Management
Blob Web Explorer allows users to manage their Azure Blob Storage Containers through a Dashboard. Users can easily add new containers with new Alias from any Azure Storage Account. This allows users to aggregate and manage all their blobs in one place.

File Management
The Blob Web Explorer provides users with an intuitive interface to manage files and folders within the containers. Users can upload, download, move, copy, or delete files and folders in the containers.
Search
The Blob Web Explorer provides a search functionality to allow users to search for files and folders within the containers.
Sharing
You can share containers with other registered users. Shared users can access the container without needing a paid plan on their own account.
Accessibility
The Blob Web Explorer enables easy and convenient access to the blob container from anywhere with an internet connection, without requiring any additional software installation.
User-friendly interface
The file explorer interface provides a familiar and intuitive way of interacting with the blob container, making it easier for users to navigate and manage their data.
Time-saving
With the file explorer, users can quickly locate and access the files they need, saving time and improving productivity.
Collaborative
The solution allows multiple users to access the same blob container simultaneously, facilitating collaboration and teamwork.
Scalability
SaaS solutions are highly scalable, so the file explorer can easily handle large amounts of data and grow as the user's needs change.
Security
The solution provides secure access to the blob container, with features such as authentication, authorization, and encryption, ensuring the safety and confidentiality of the data.
Getting Started with Blob Web Explorer
Sign Up
Follow the steps below to create your account:
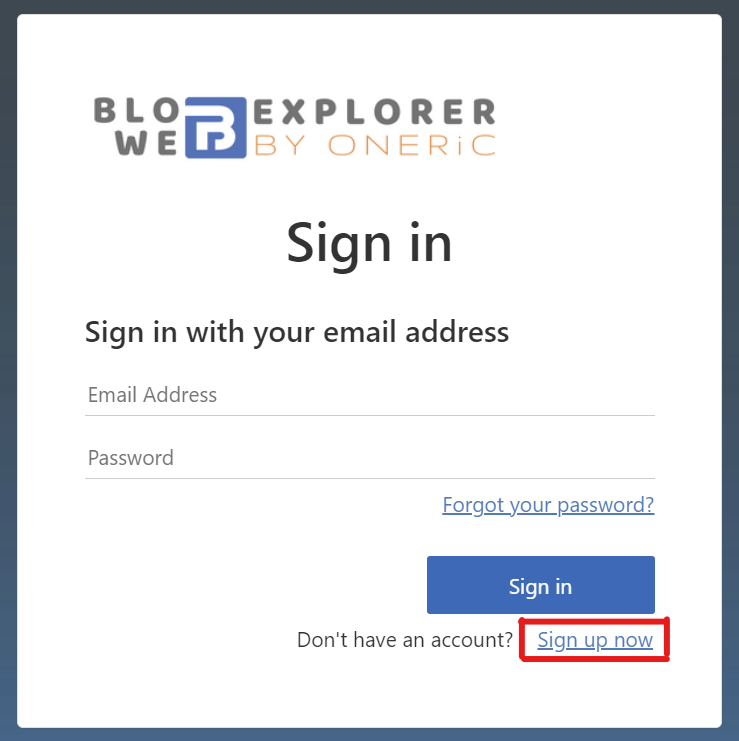
- Go to blobexplorer.com. The sign-in/sign-up dialog opens.
- Click the "Sign up now" link to start registration.
- Enter your account details:
- Email address
- Password
- Country
- Full name
- Enter your email address first and click "Send verification code".
- You will receive an email verification code in your mailbox.
- Enter the verification code and click "Verify code".
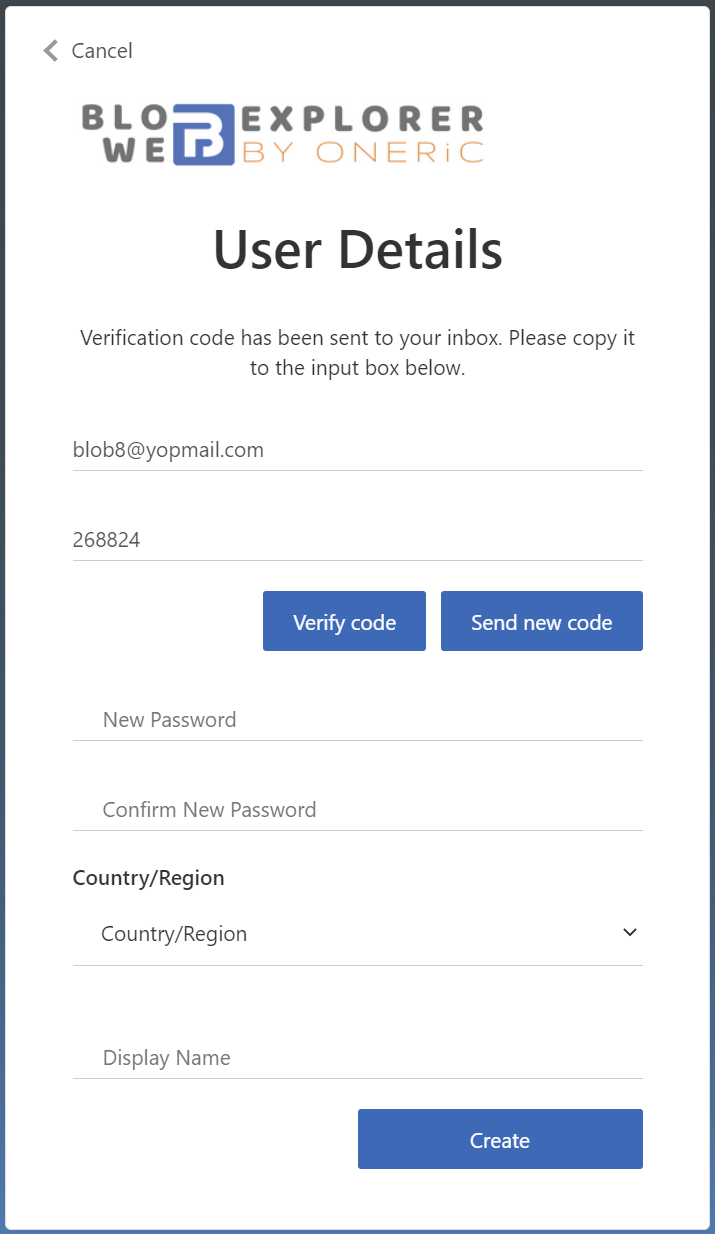 Note The verification code expires after 10 minutes.
 - Complete the remaining information:
- Create and confirm your password.
- Select your country from the list.
- Enter your full name or company name, then click "Create".
Note The name you provide appears on invoices. - After registration is complete, you are redirected to the dashboard.
Link Container
Prerequisites
Before linking a container in Blob Web Explorer, create an Azure Storage Account in your Azure subscription.
Create an Azure storage account
- Create an Azure Storage Account. See the link above.
- Ensure that your storage account public network is Enabled from all networks.
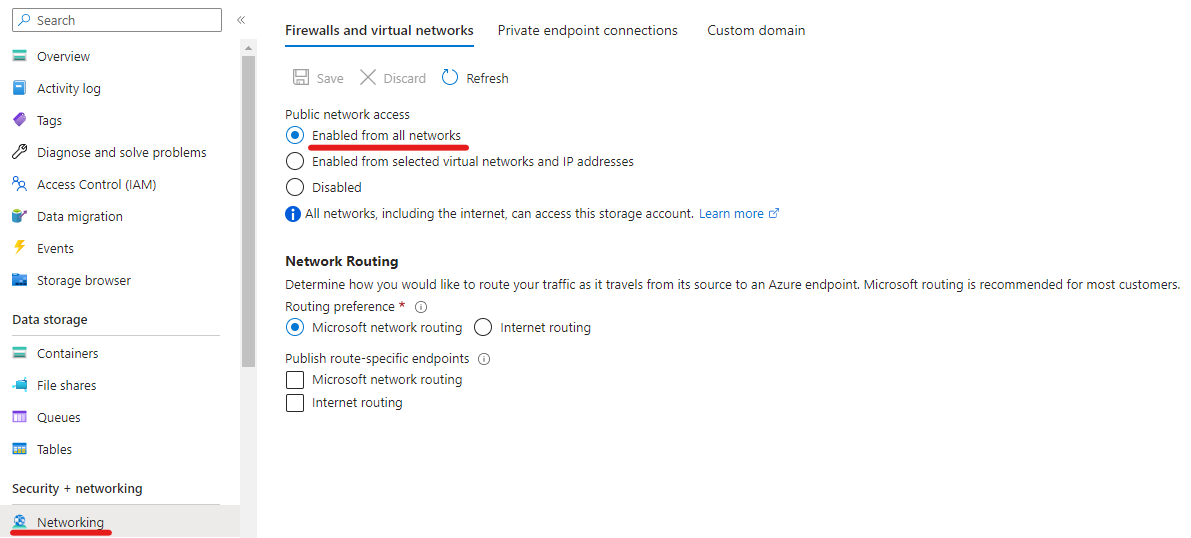
- The container Public access level can keep the default value as "Private"
Linking container
- Sign in to your account on blobexplorer.com.
- Click on "Link Container" menu or "Link container" action.
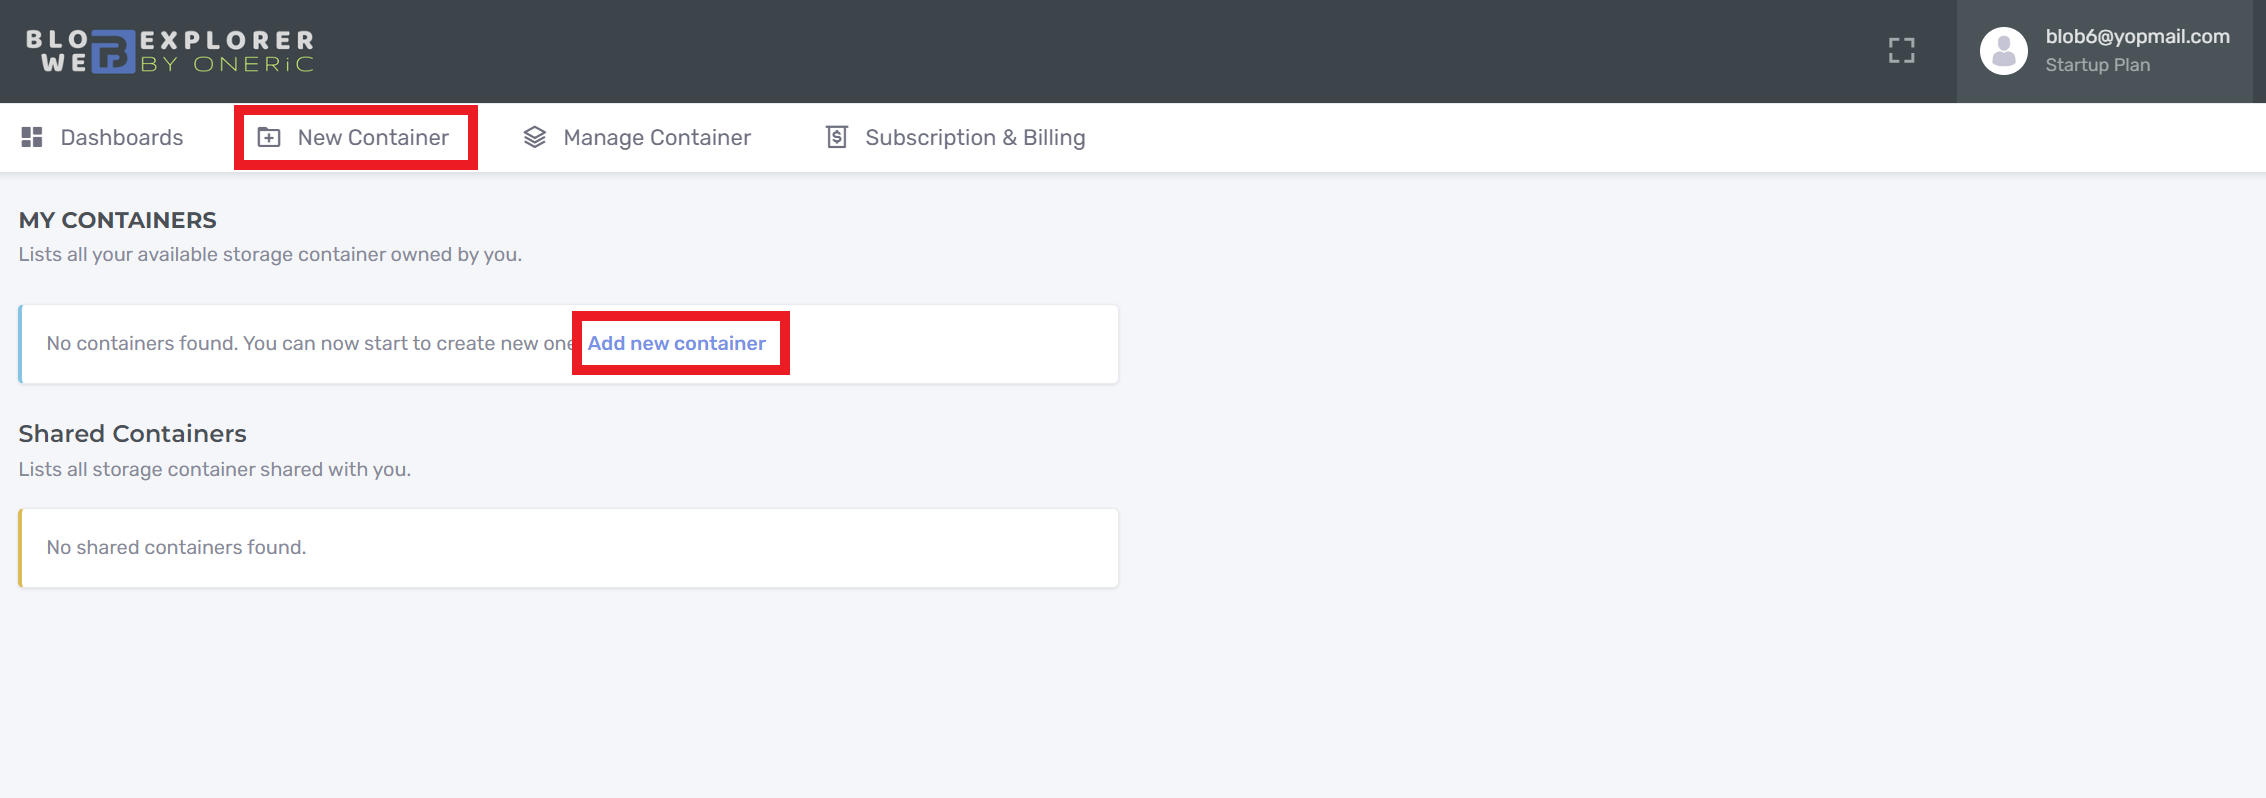
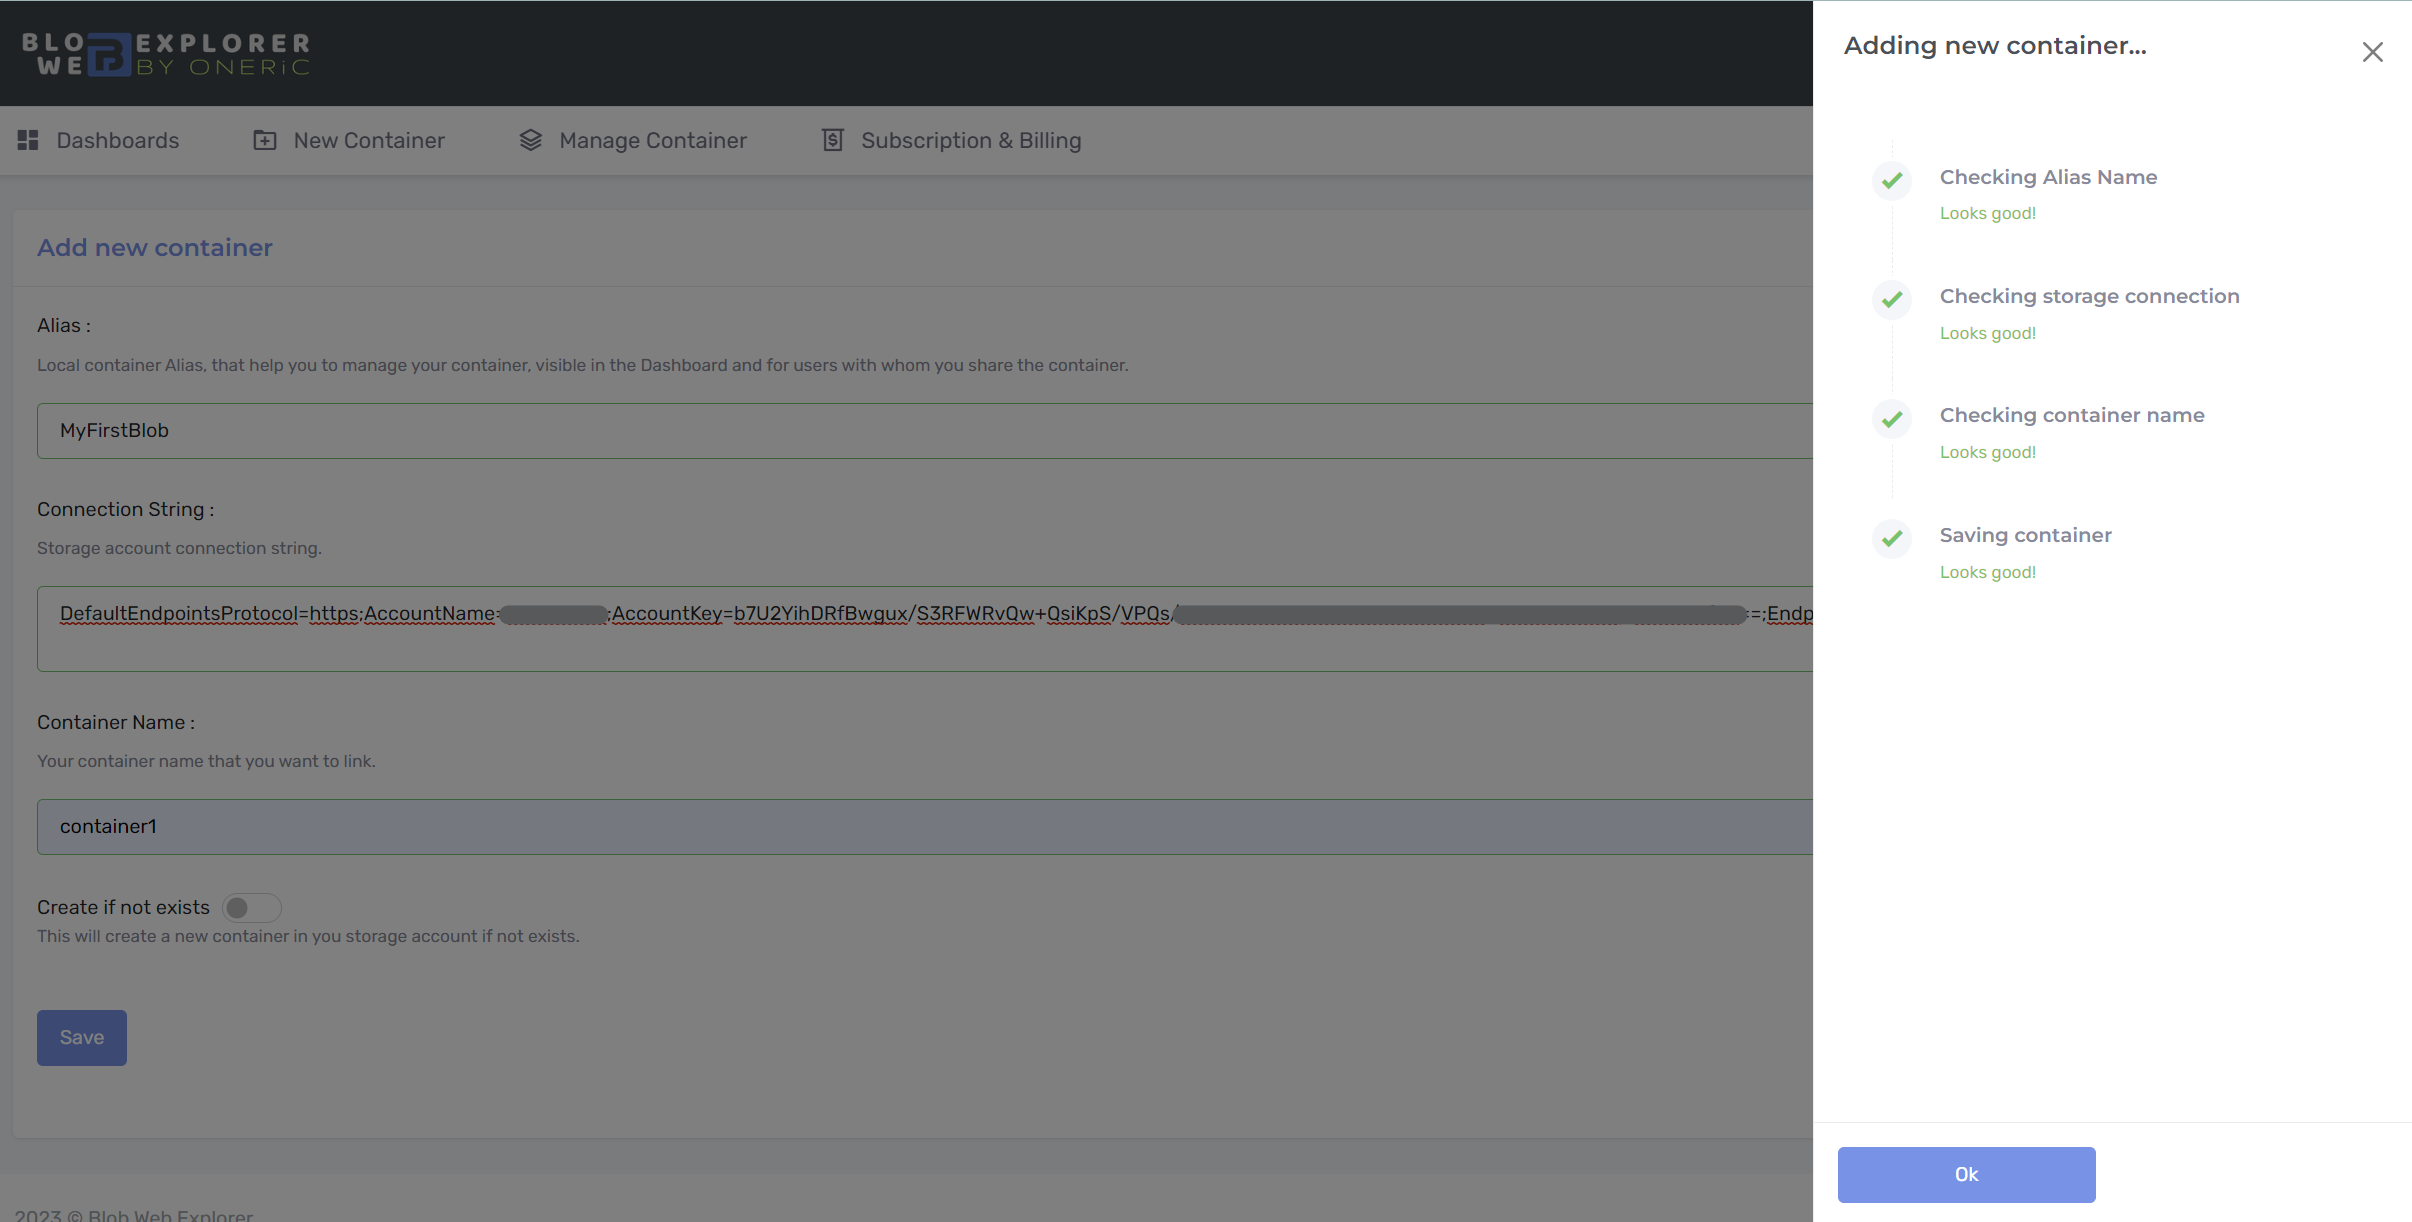
- The Link Container form appears. Fill in:
- Alias: A unique name used to identify and share the container.
- Connection String: The Azure Storage connection string used by Blob Web Explorer to connect securely.
- Container Name: Your Azure Blob container name.
- Create if not exists: Creates the container automatically if it does not already exist.
- Click on the "Save" button.
- The validation panel appears and confirms whether the operation succeeded.
- On Free plan, when your container quota is reached, the upgrade prompt appears only when you click "Link Container" for an additional container.
- If validation succeeds, click "Ok". You are redirected to the dashboard and the new container is listed.
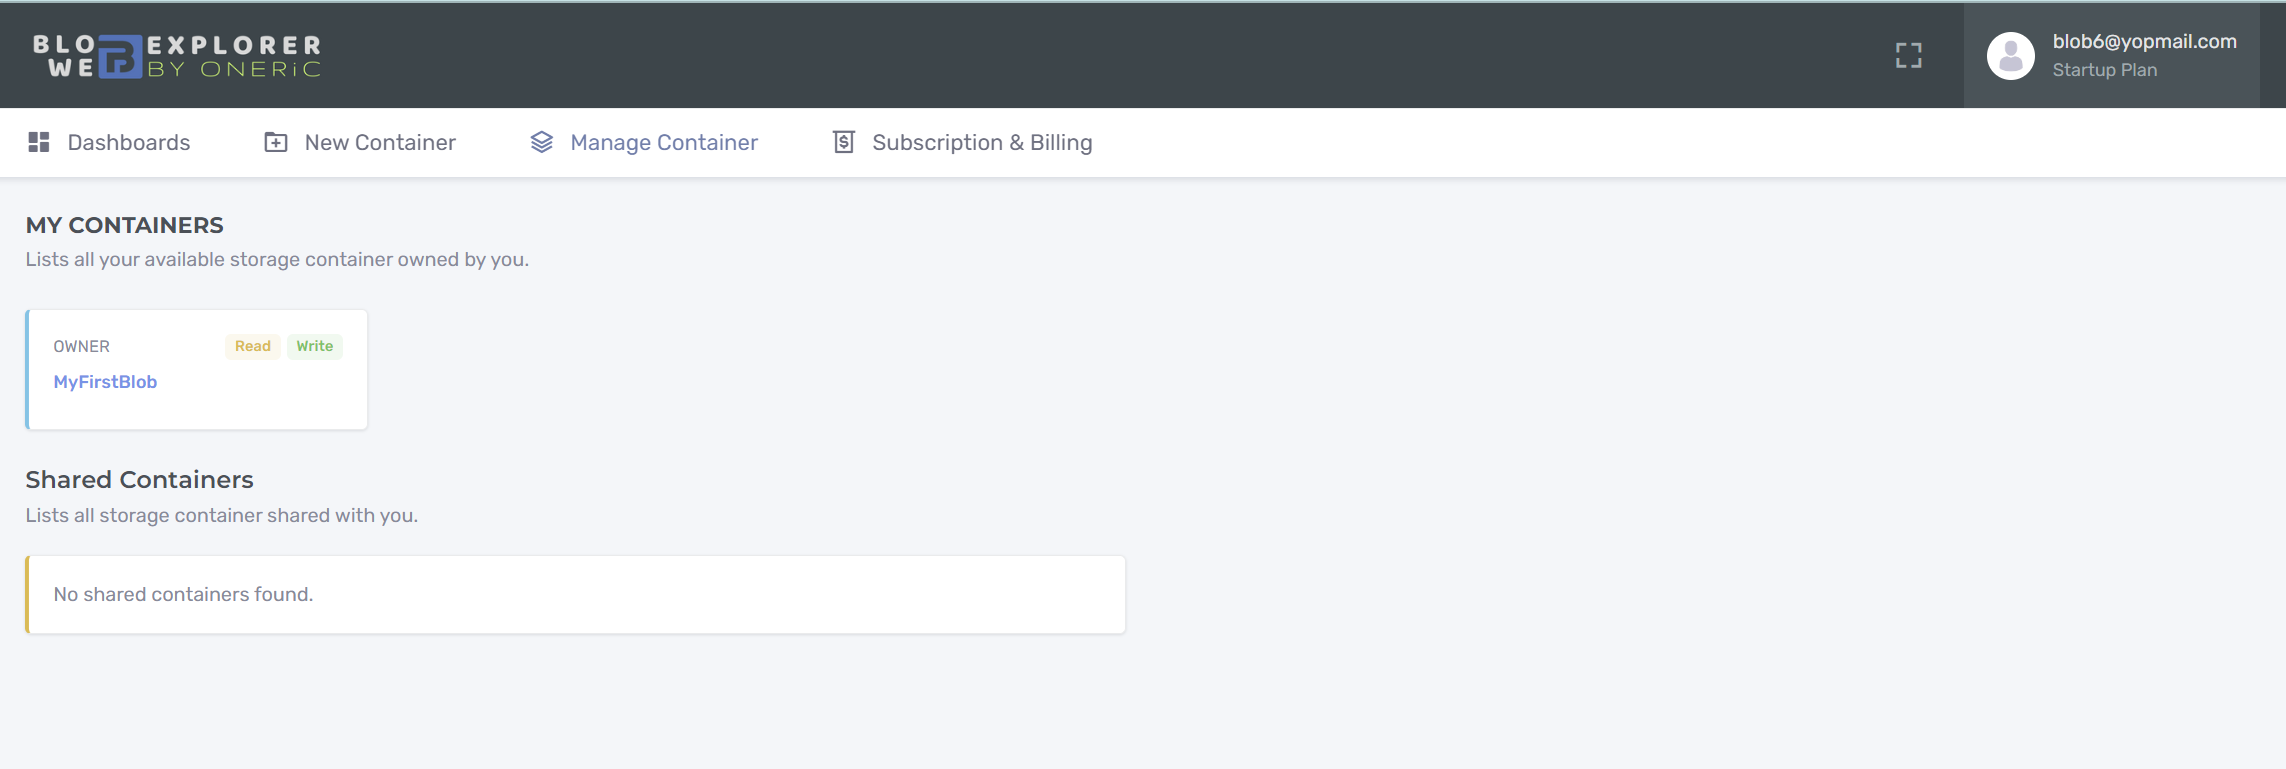
- Click on Alias to explore your Blob Storage Container.
By default you are the Owner of the container that you create. Thus read and write permission will be granted on the Blob Storage Container.
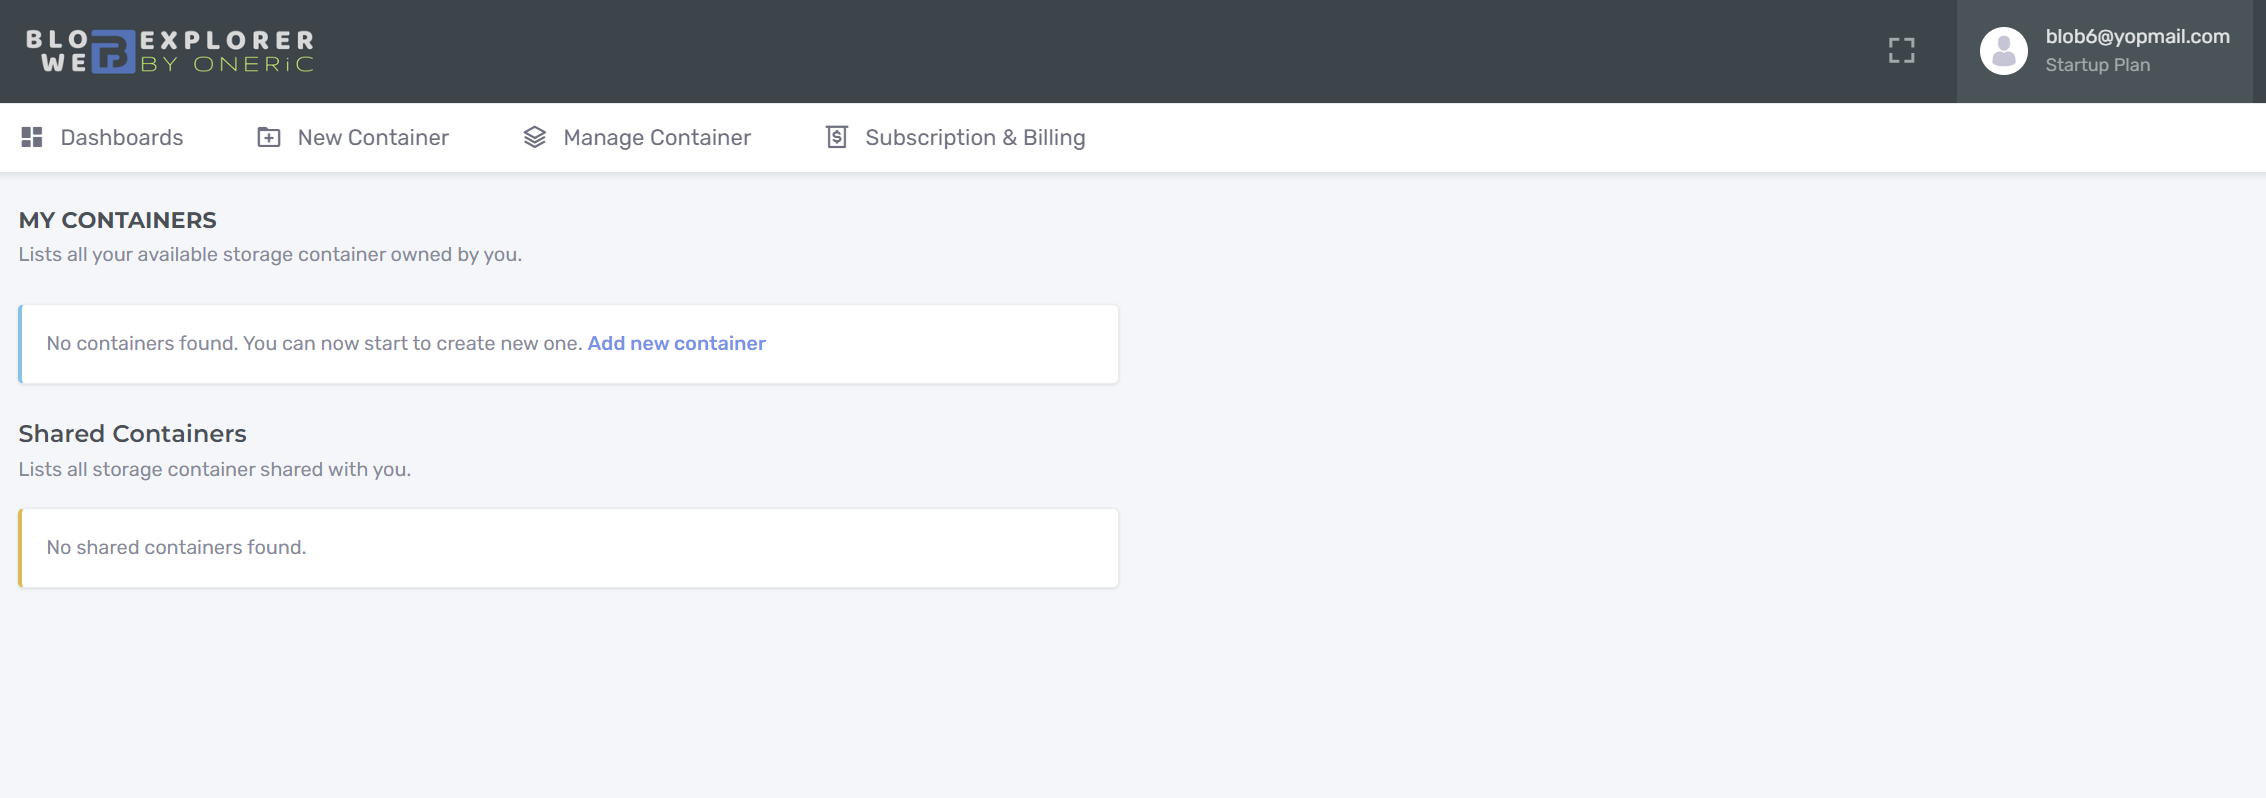
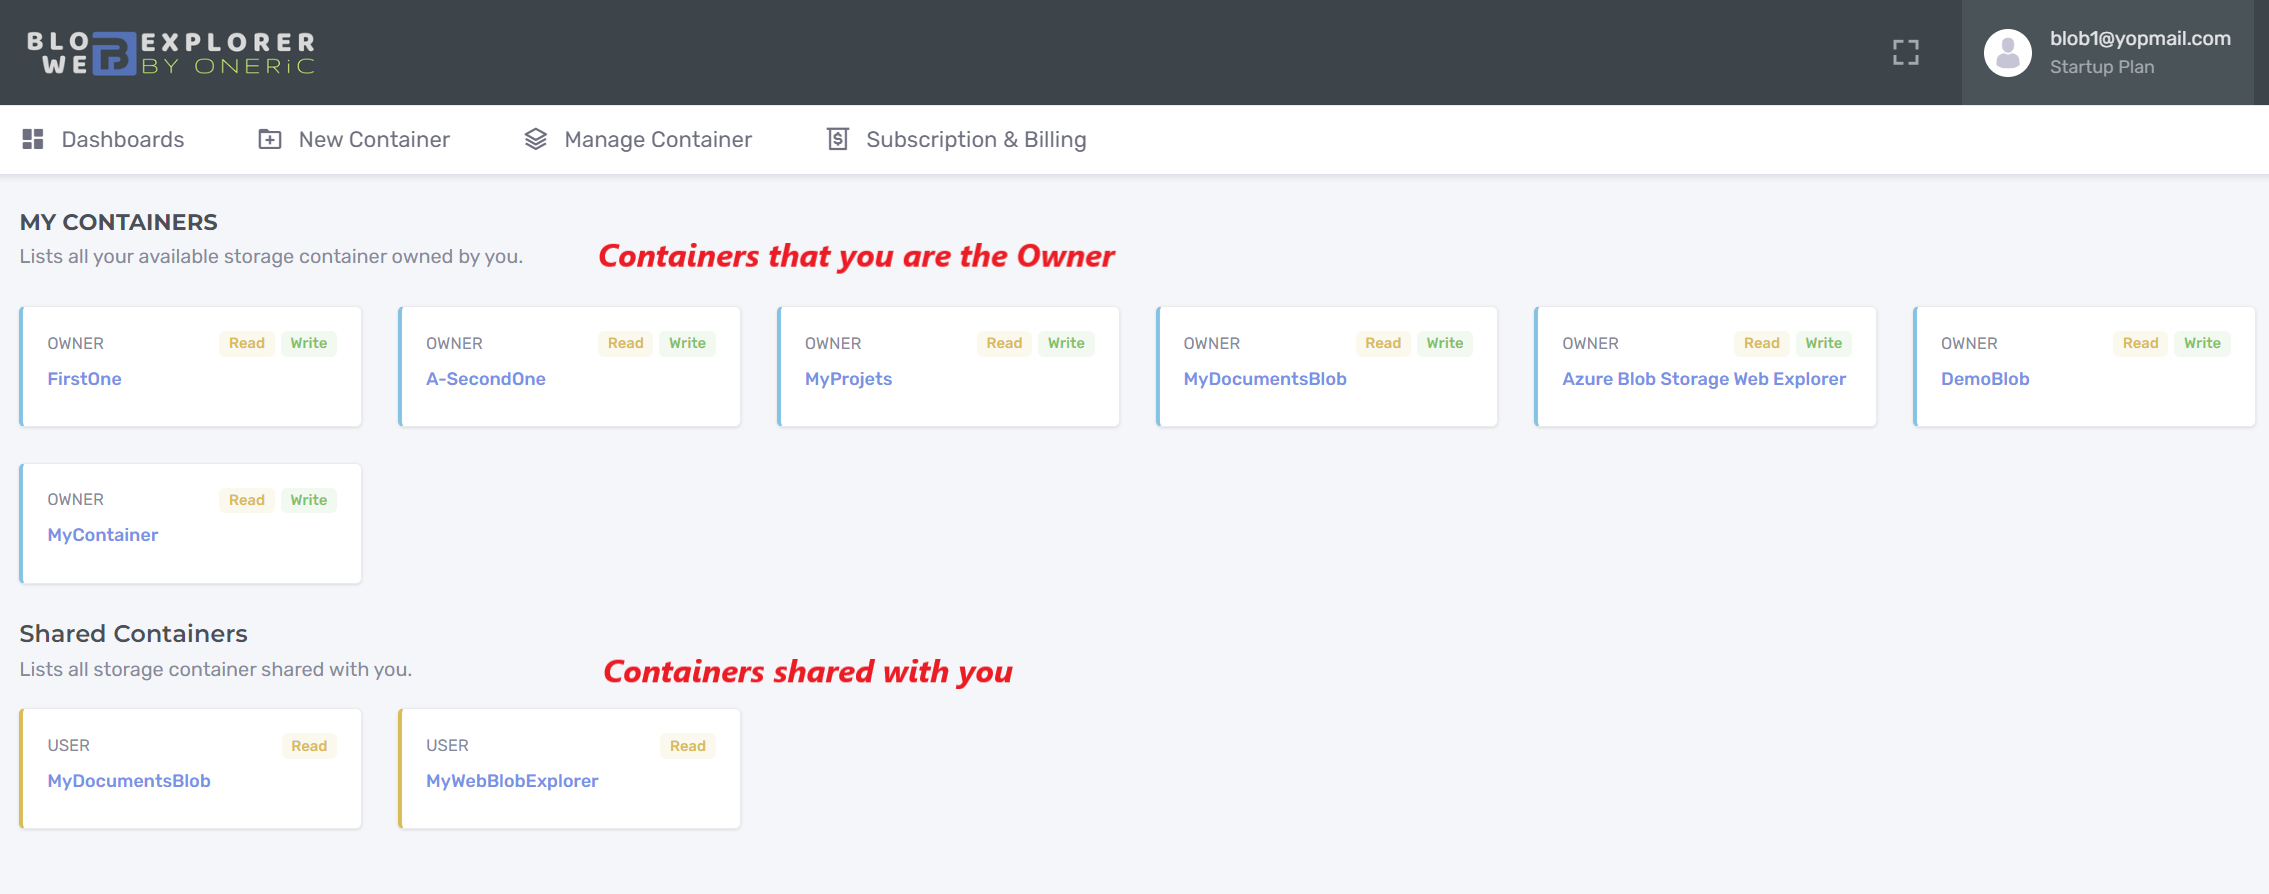
Dashboard
The Dashboard lists all the containers available to you, it is divided in two parts:
- The first part is for the Containers that you are the Owner
- The second part is for those shared with you as a User
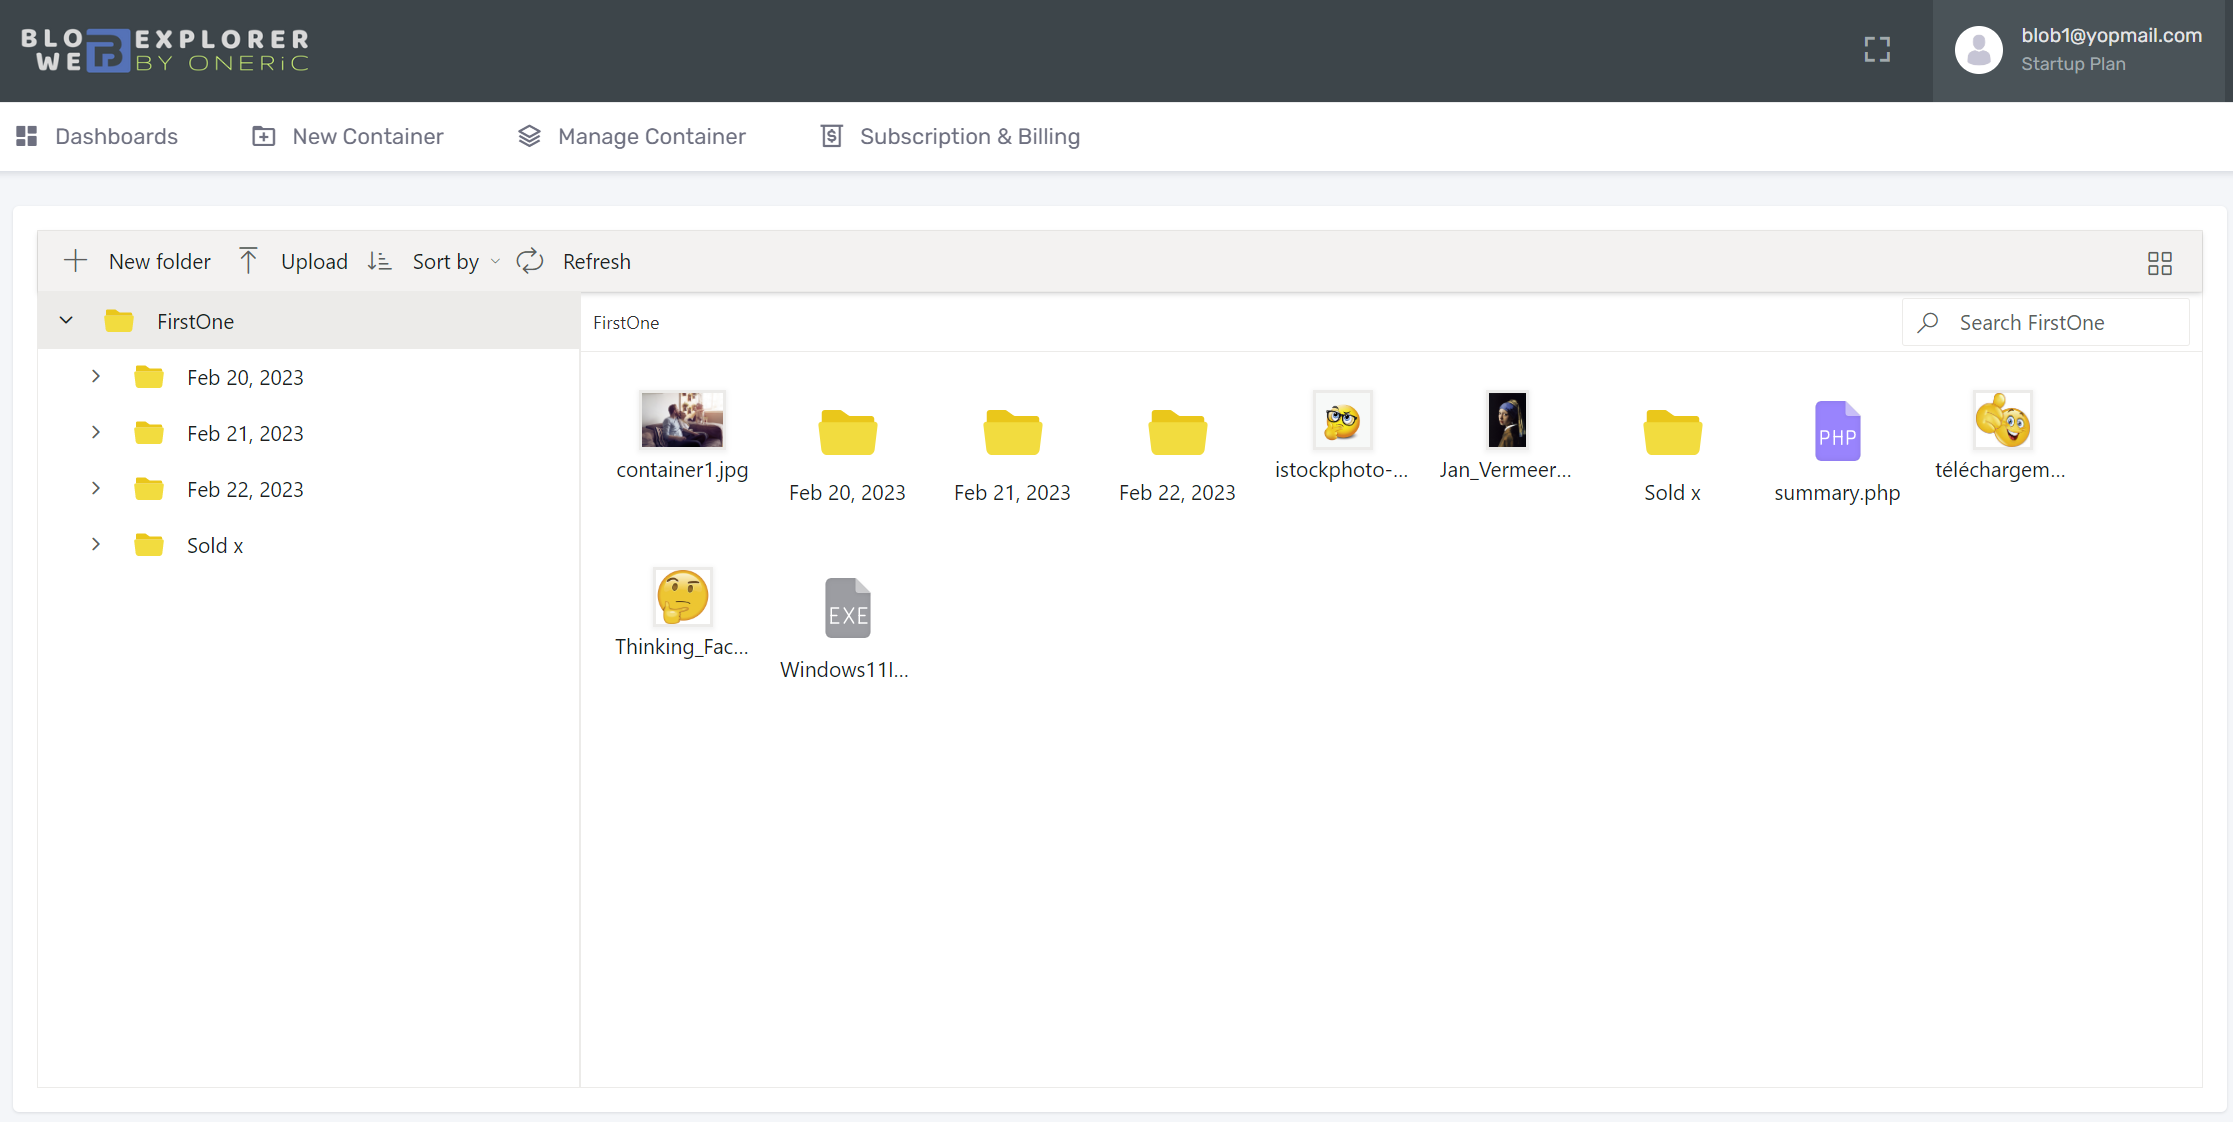
Blob Explorer
After adding the container, you can start explore your blobs. Blob Explorer let you manage your Blob Container as a simple file explorer.
User Interface
The blob explorer interface provides a familiar and intuitive way of interacting with the blob container, making it easier for users to navigate and manage their data. Users can upload, download, move, copy, or delete files and folders in the containers.
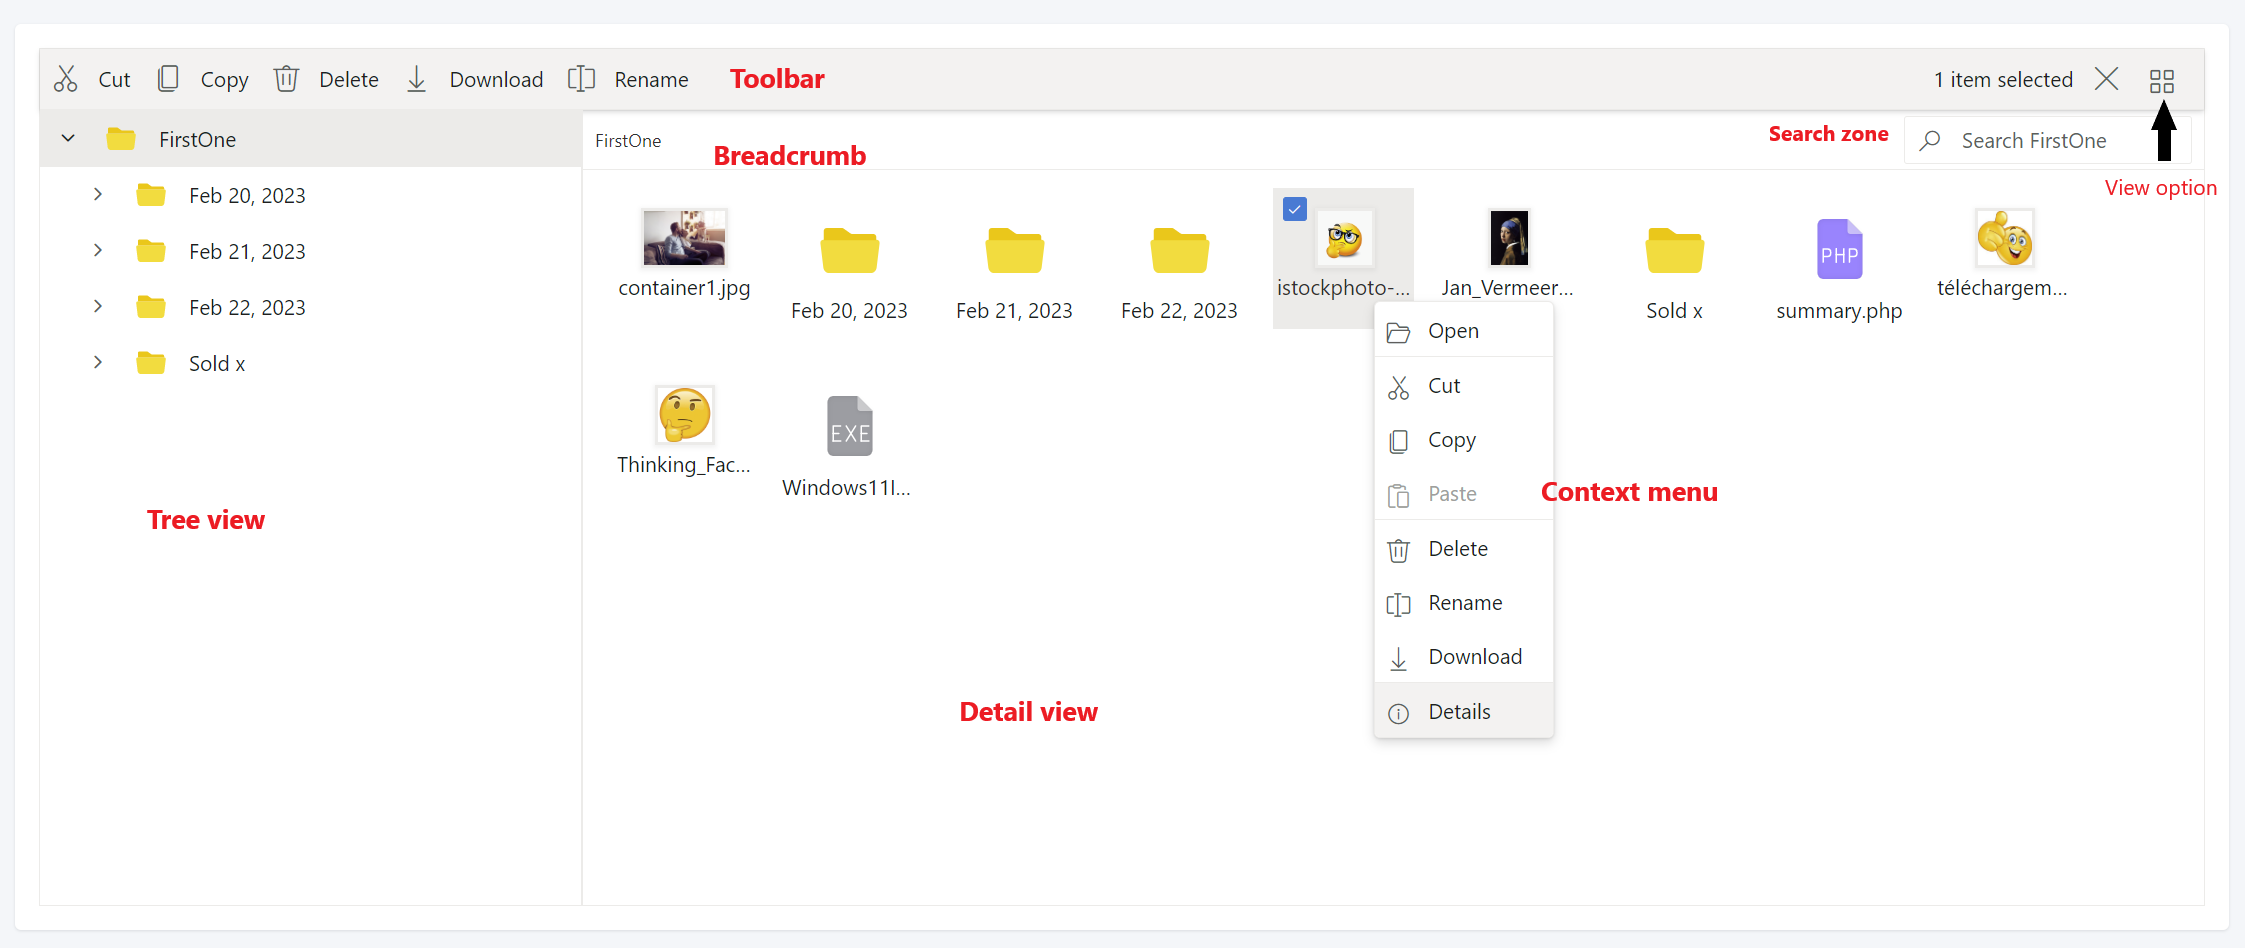
Toolbar
The Toolbar provides easy access to the file operations using different buttons and it is presented at the top of the file manager.
Tree view
The Tree View displays the folder hierarchy of the file system and provides easy navigation to the desired folder.
Breadcrumb
The file manager provides breadcrumb for navigating to the parent folders. The breadcrumb the in file manager is responsible for resizing. Whenever the path length exceeds the breadcrumb length, a dropdown button will be added at the starting of the breadcrumb to hold the parent folders adjacent to root.
View
View is the section where the files and folders are displayed for the user to browse. The file manager has two types of views to display the files and folders.
Details view
In the details view, the files are displayed in a sorted list order. This file list comprises of several columns of information about the files such as Name, Date Modified, Type, and Size. Each file has its own small icon representing the file type.
Context menu
The context menu appears on user interaction such as right-click. The file manager is provided with context menu support to perform list of file operations with the files and folders. Context menu appears with varying menu items based on the targets such as file, folder (including navigation pane folders), and layout (empty area in view).
File Management
The following table represents the operations available in blob explorer :
| Action | Description | Role Classification |
|---|---|---|
| search | Searches for items matching the search string in the current and sub folders | Read |
| read | Read the content of files or folders available in the given path | Read |
| create | Create new folder in the current path | Write |
| delete | Delete files or folders | Write |
| copy | Copy selected file or folder to target path | Write |
| move | Cut selected file or folder | Write |
| rename | Rename the selected file or folder | Write |
| download | Download one or multiple file from blob storage | Read |
| upload | Upload file to the current path in blob storage | Write |
Upload Files
BlobExplorer supports uploading individual files, multiple files at once, and chunked upload.
Drag & Drop
Drag files from your computer directly into the explorer window. The upload starts automatically.
Upload button
Click the Upload button in the toolbar, select your files and click Open.
Upload modes
BlobExplorer can run in two upload modes when external upload is configured:
- Native Syncfusion upload (default): lower operational cost, configurable limits.
- Paid external upload module (optional): enhanced large-file capabilities and advanced upload flow.
Large files
In native mode, uploads use Syncfusion FileManager built-in upload flow with configured max file size and chunk size. In paid external mode, large files are handled by the dedicated upload service.
Activation rule: External upload is enabled by configuration (`EnablePaidExternalUpload`, `UploadSaveUrl`, `PassPhrase`) and is not tied to `PlatinumPlan`.
Note: If a file with the same name already exists in the same folder, it will be overwritten without warning. Rename it before uploading if you want to keep both versions.
| Plan | Max file size |
|---|---|
| Free | 100 MB |
| Starter | 500 MB |
| Business | 5 GB |
| Platinum (native mode) | Configured by tenant (default: 100 MB) |
| Platinum (paid external module) | Up to 200 GB |
Download Files
Single file
Right-click a file and select Download, or select the file and click Download in the toolbar.
Multiple files
Select multiple files using Ctrl+Click or Shift+Click, then click Download. Files are packaged as a ZIP archive.
Any user with Read or Write access to a container can download its files.
Organize Files
Create a folder
Click New Folder in the toolbar, enter a name and press Enter.
Rename
Right-click the file or folder and select Rename.
Move
Select files, right-click and choose Move, or use drag and drop between folders.
Delete files
Select files, press Delete or right-click and choose Delete. Confirm in the dialog.
File deletion is permanent. Deleted files cannot be recovered.
All organize operations require Write access to the container.
Manage Container
Use the container management screen to review configuration, sharing, and access details.
- Open the "Manage Container" menu.
- The table lists containers you own.
- Click the alias name or the "Eye" icon
 to open container details.
 - Click the "Folder" icon
 to open the container directly in Blob Explorer.
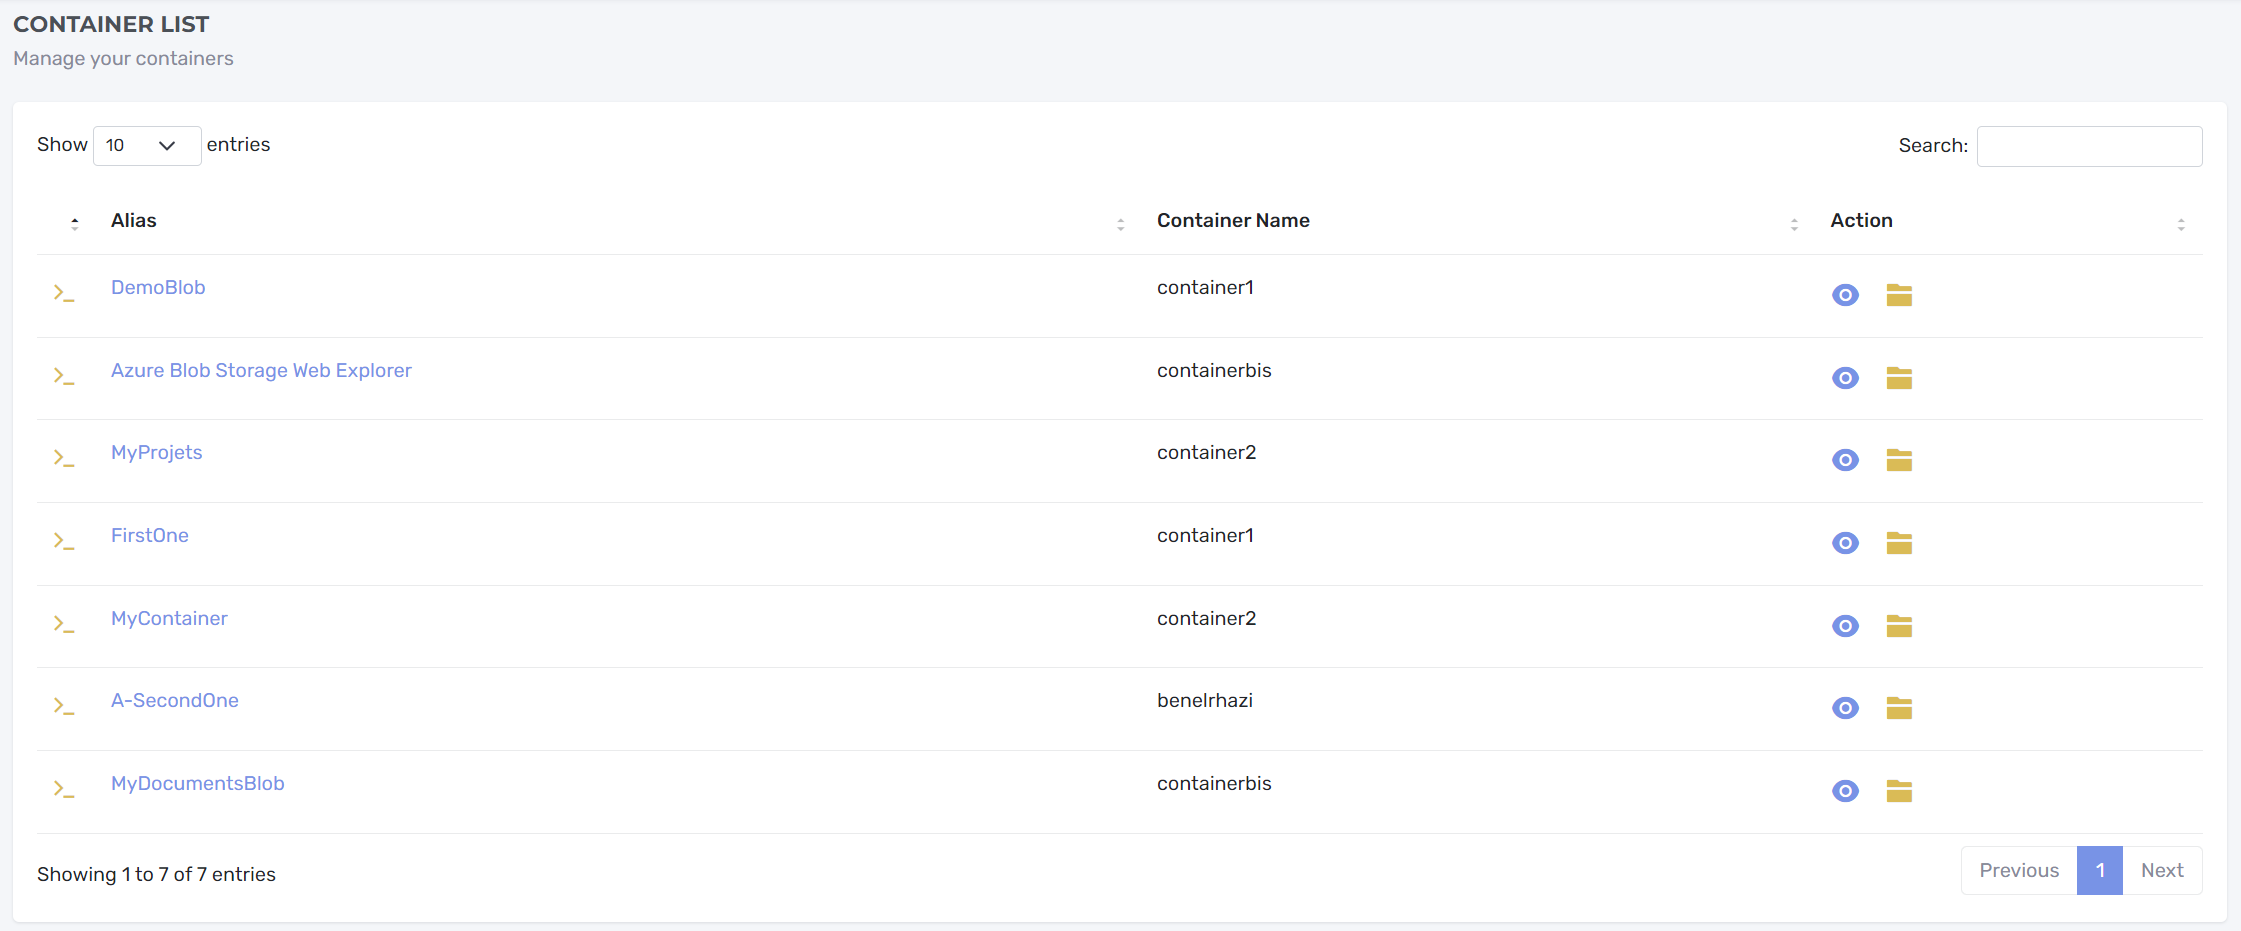
- In the details view, you can see:
- Alias
- Azure Storage container name
- Creation date
- Connection string (display only; editing is not allowed)
- Users with whom the container is shared

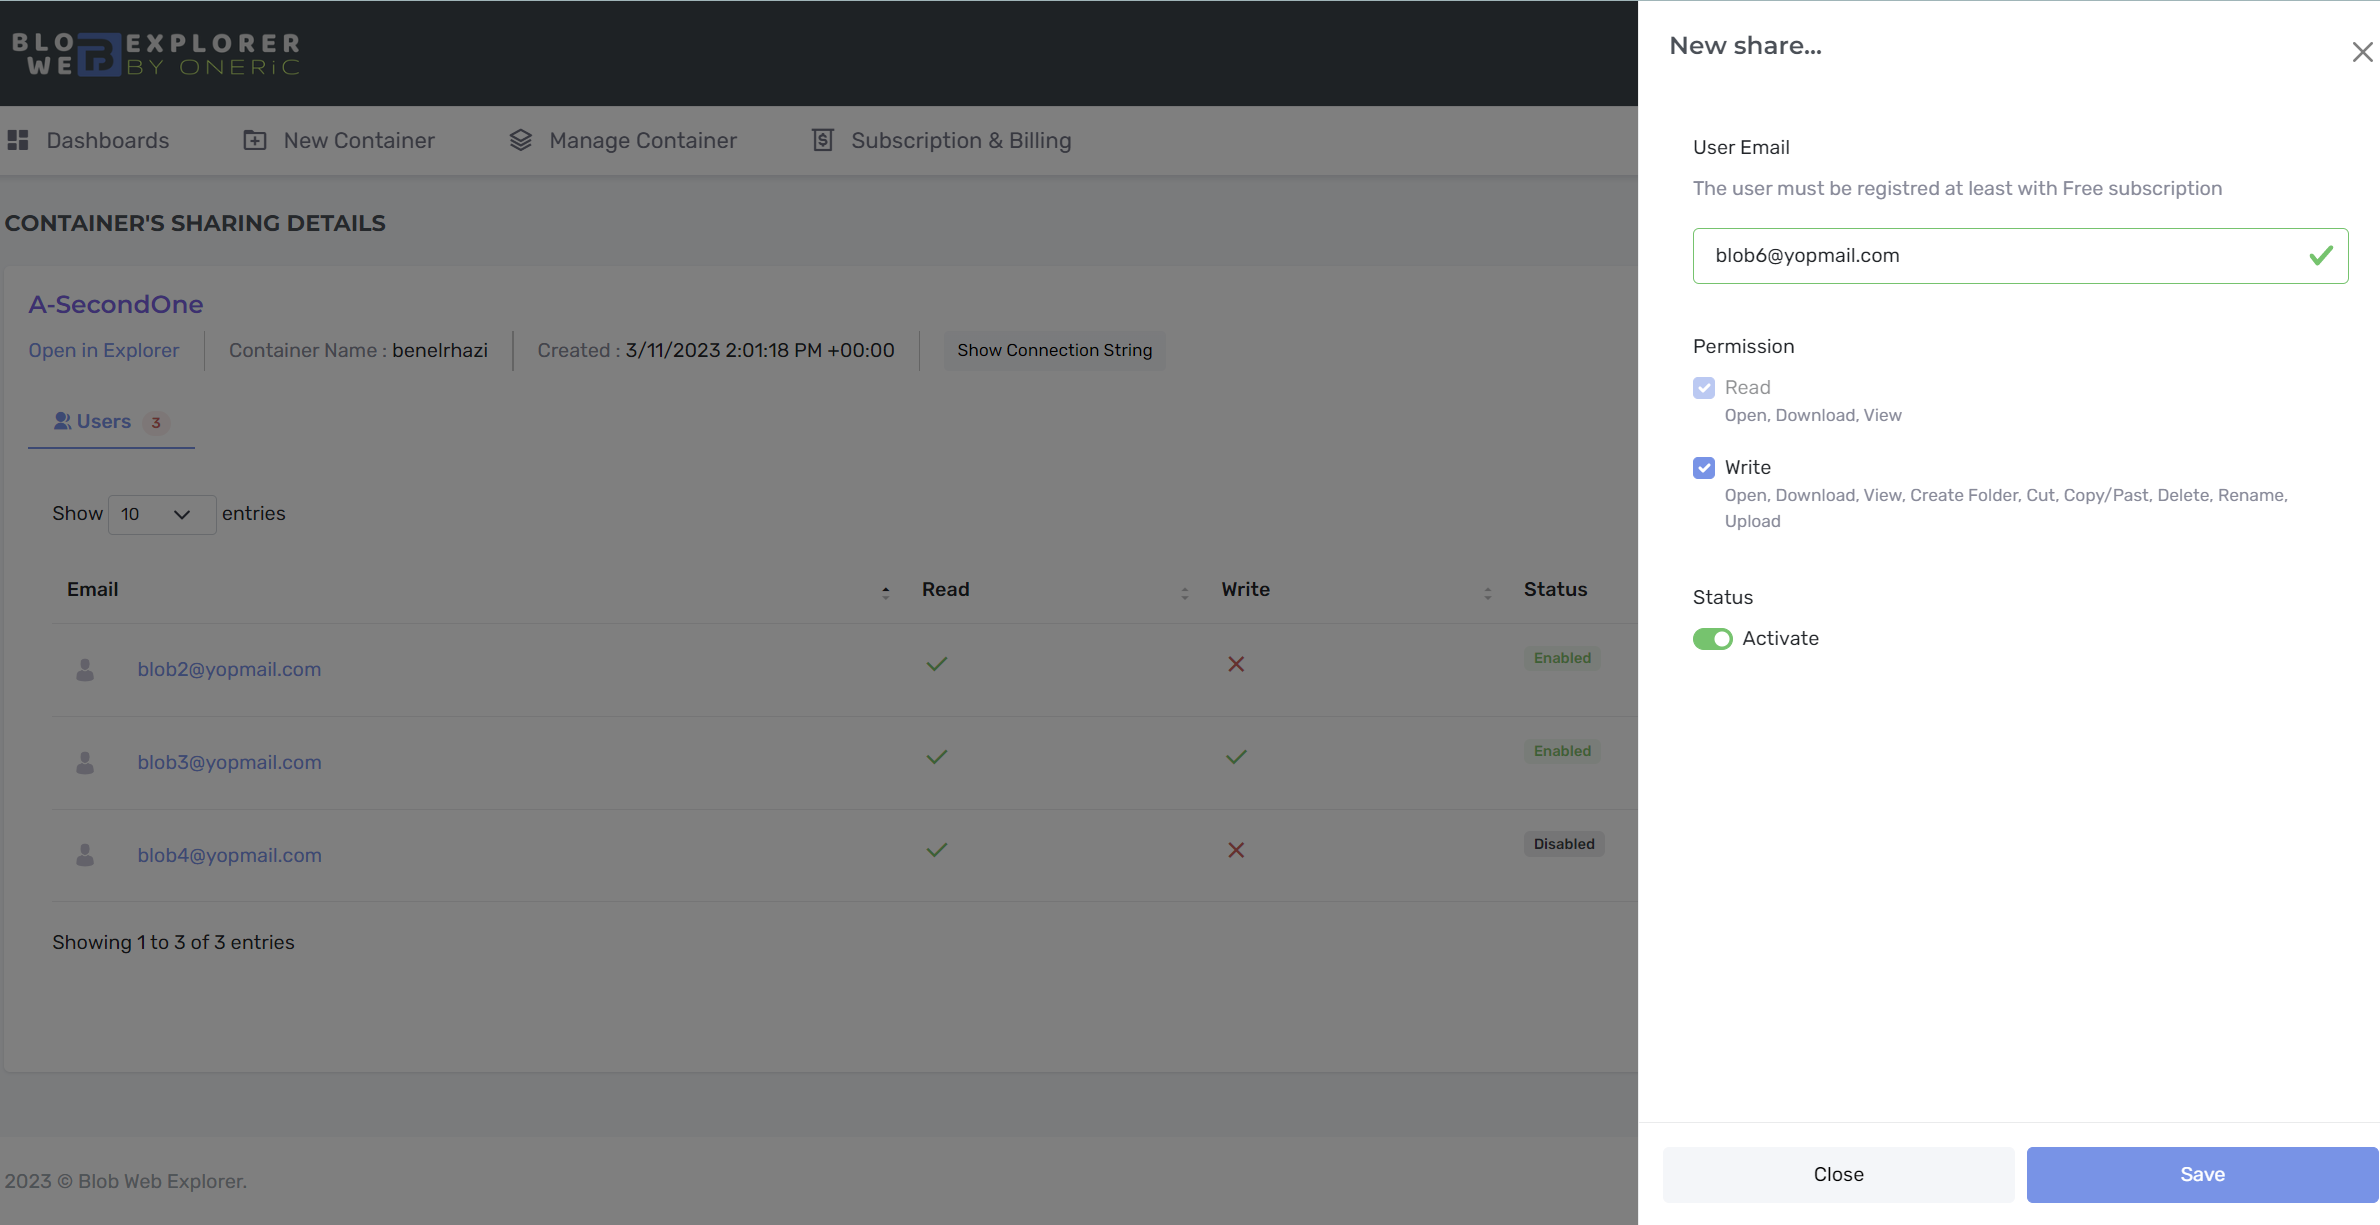
Share Container
To share a container:
- Click on "New Sharing" button.
- Enter the email address of the user you want to share with. The user must already be registered on Blob Web Explorer.
- Set the permission level: Read and/or Write. Read is selected by default. See the permission matrix above.
- Use the Status switch to enable or disable the share.
- Review the list of users currently shared on this container.
- Click "Save" button.
Stop Sharing
The Stop Sharing button removes access for all currently shared users on that container.
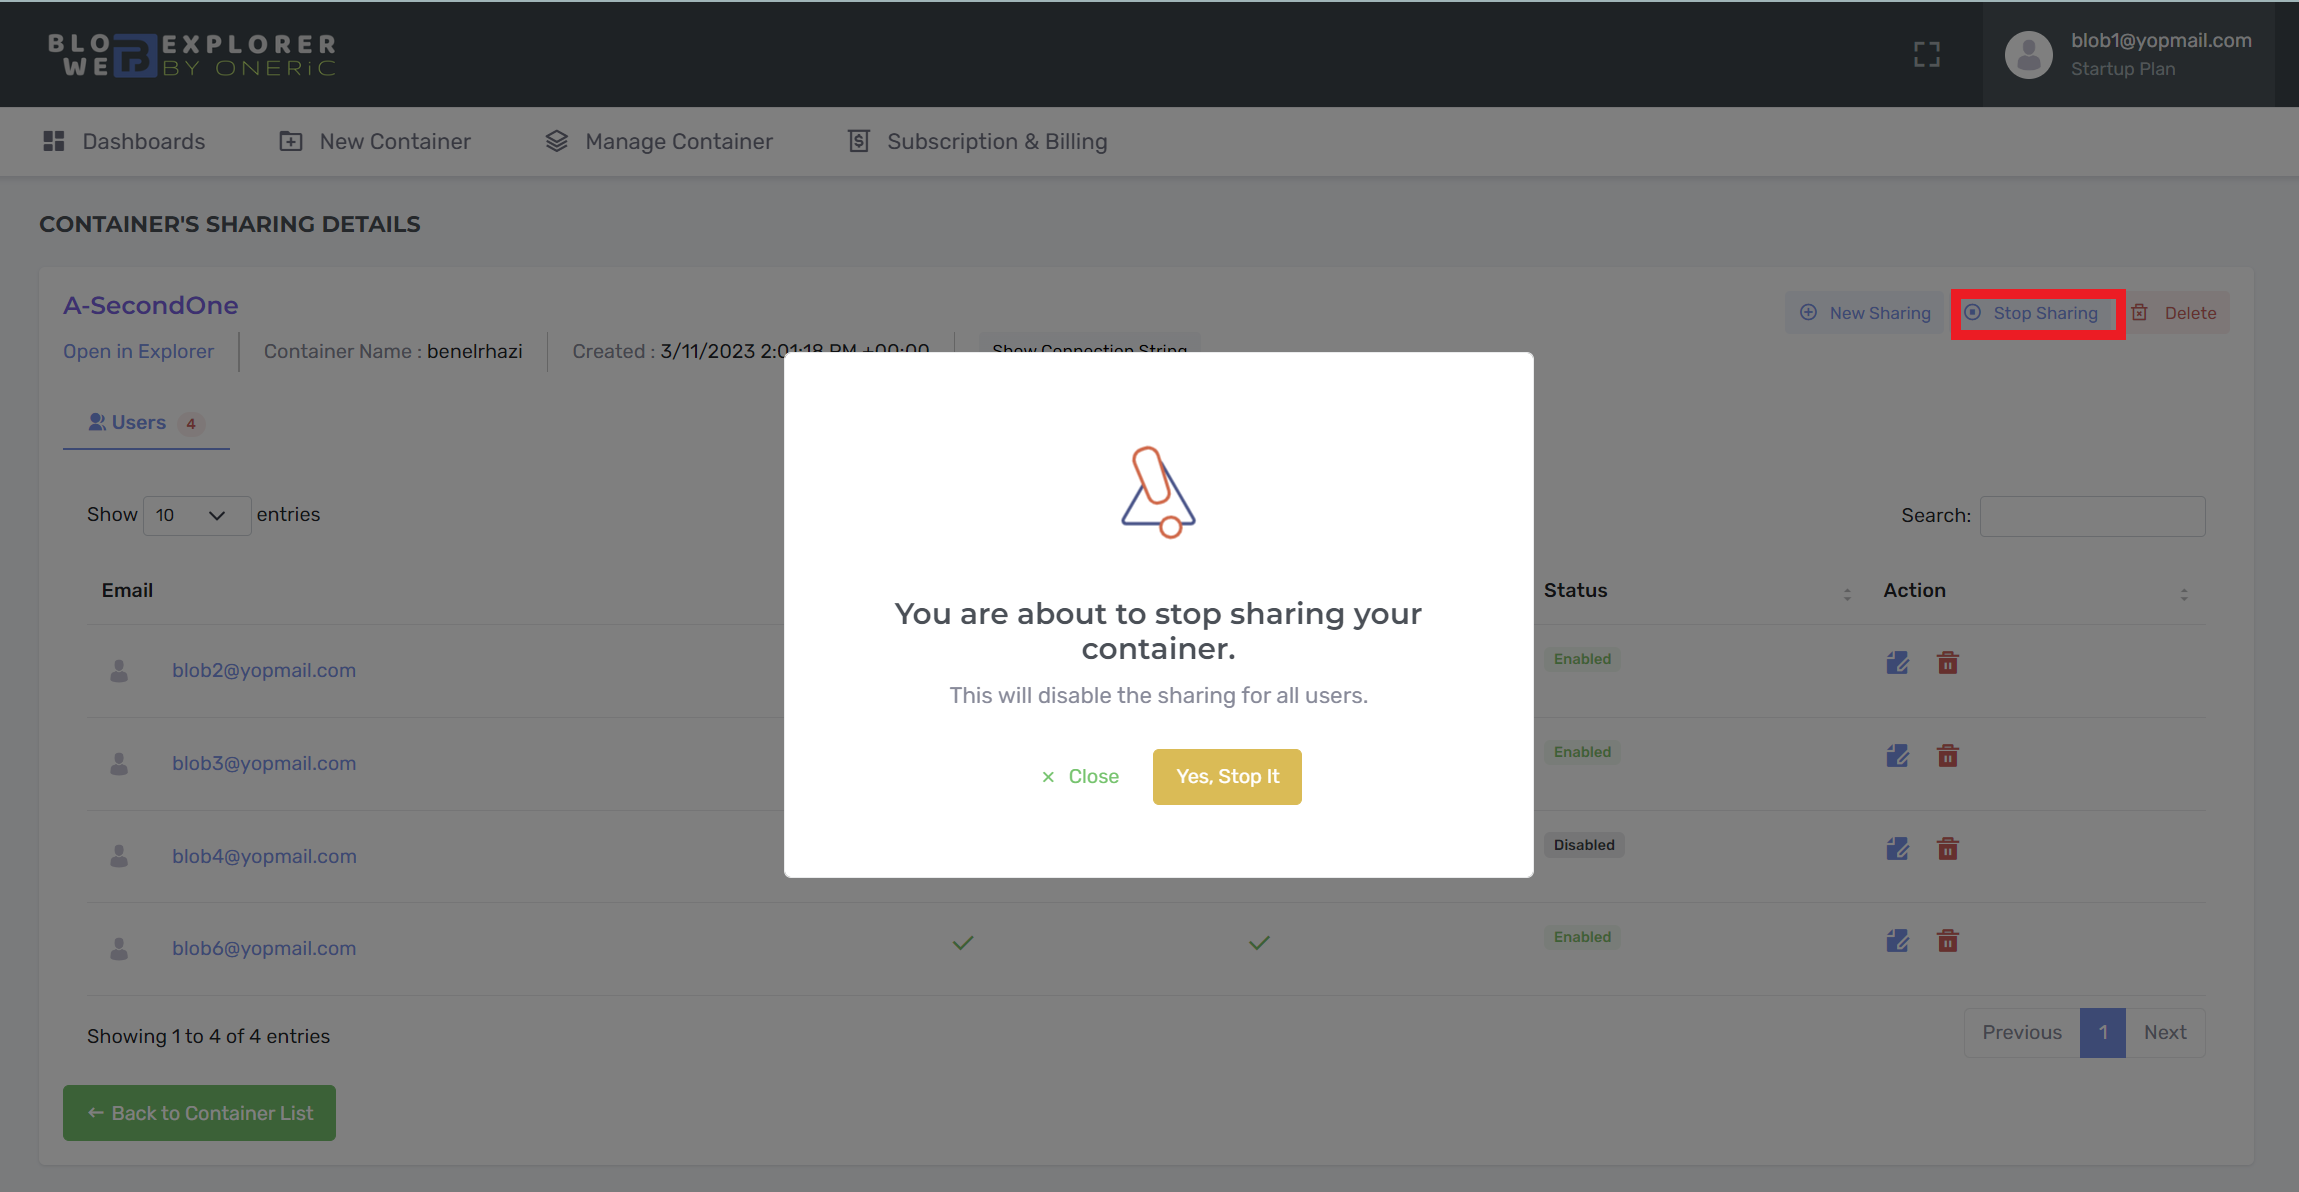
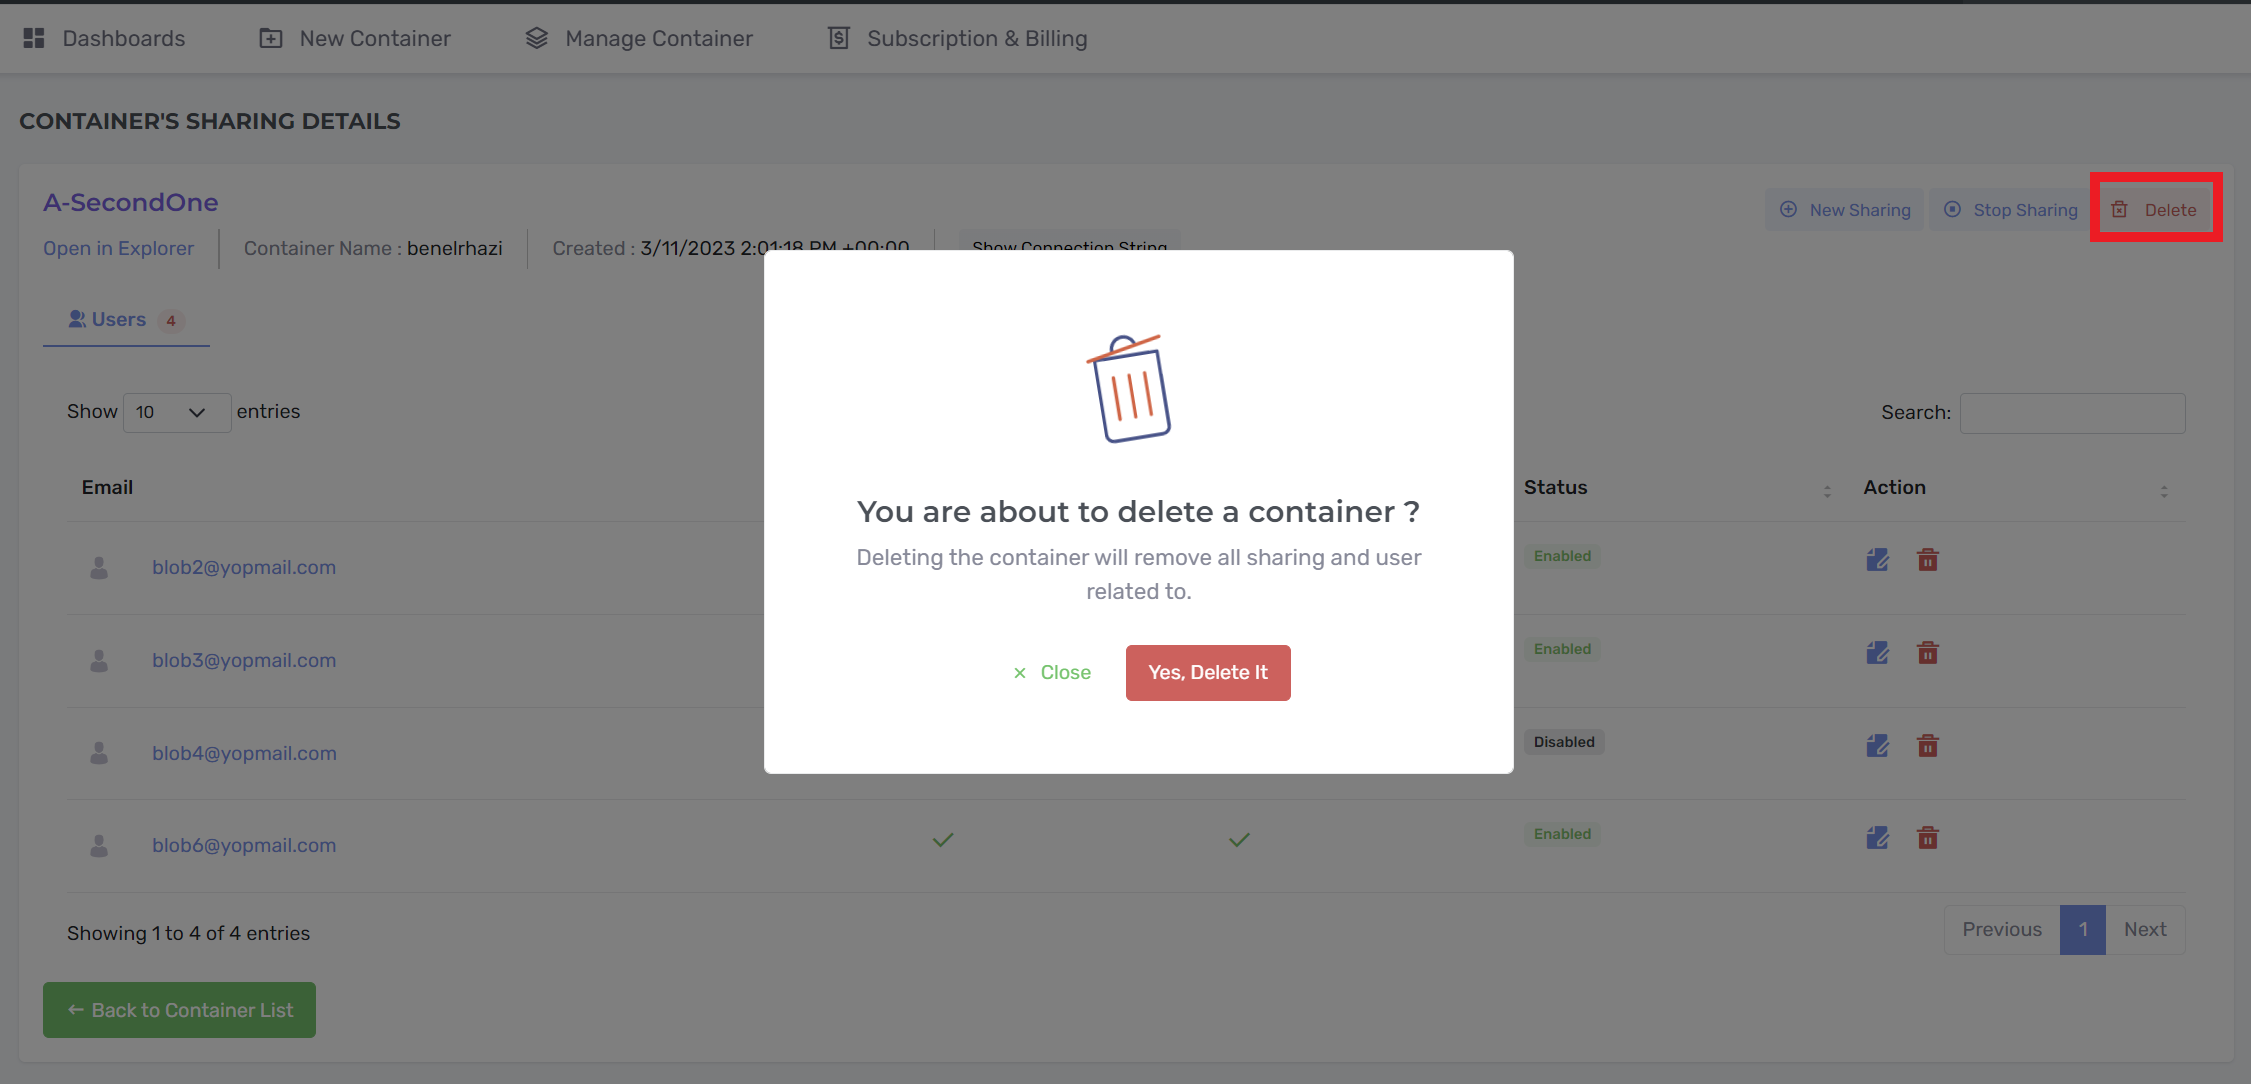
Delete Container
Deleting a container removes it from Blob Web Explorer and revokes all existing shares.
Subscription & Billing
There are several subscription plans in Blob Web Explorer application that you can subscribe to. Subscription and Billing are managed by Stripe Customer Portal. Stripe Customer Portal Documentation
Pricing Plan
Here is the pricing table:
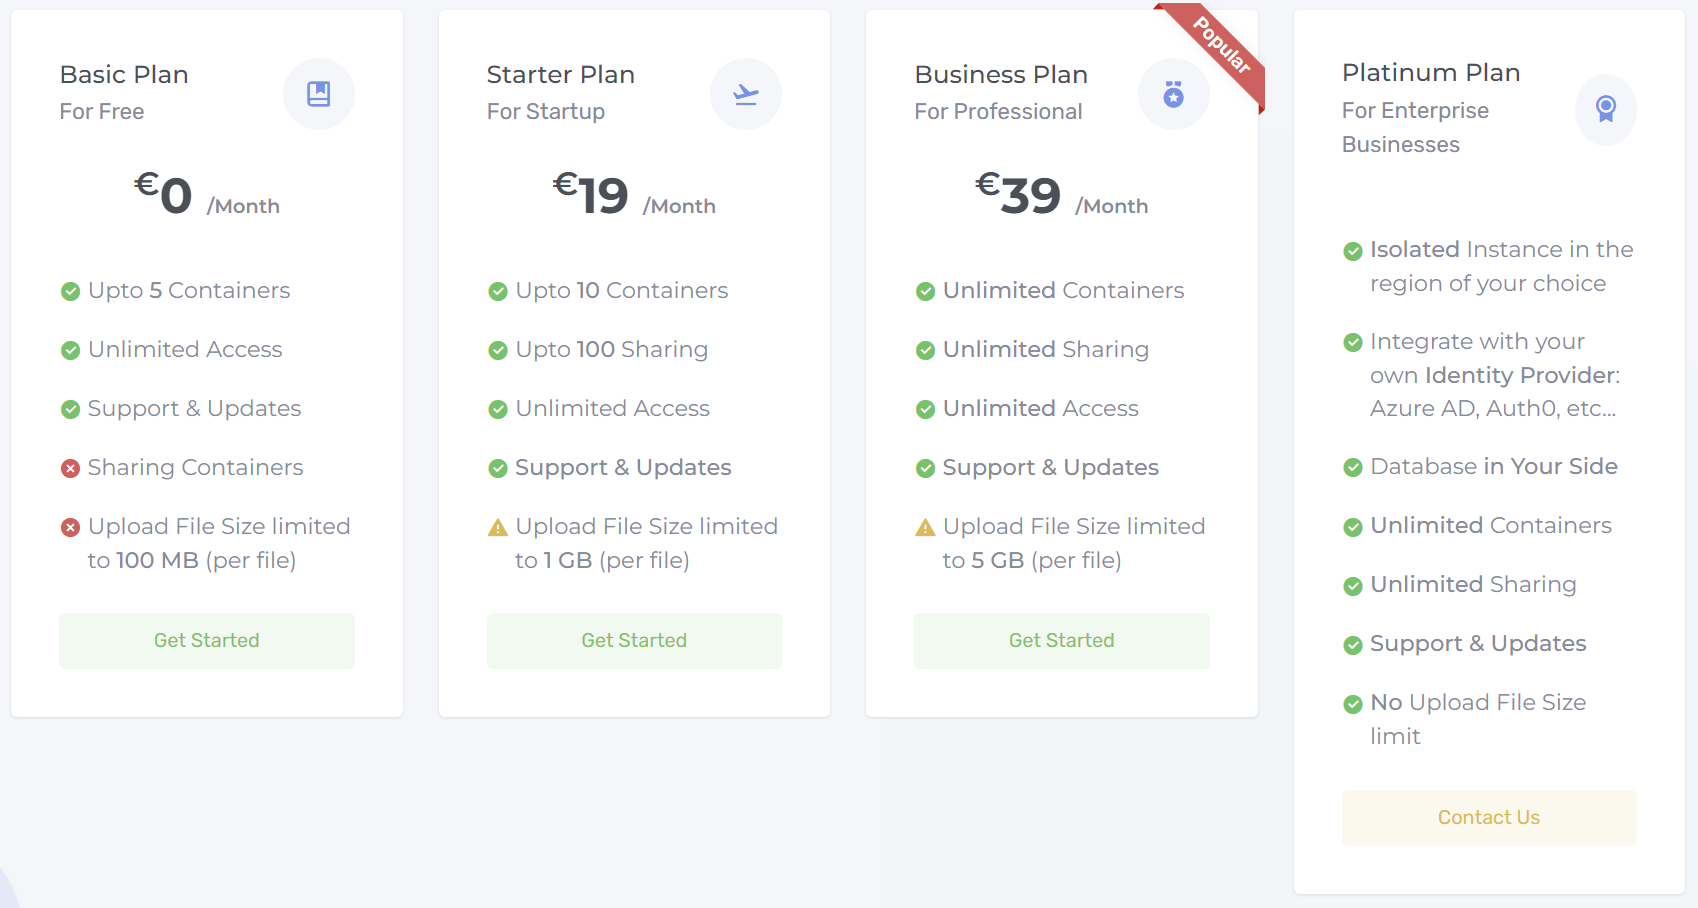
| Plan | Container limit | Sharing |
|---|---|---|
| Free | 1 | Not available for owners (upgrade required) |
| Starter | 10 | Up to 100 |
| Business | Unlimited | Unlimited |
| Platinum | Unlimited | Unlimited |
Note: these limits are enforced by the server as well as the UI. Even if a client bypasses the front end, container creation and sharing still follow the active plan saved for the account.
When you register to Blob Web Explorer the Free Plan is assigned to you by default. This plan has no access limit in time.
Subscribe to Plan
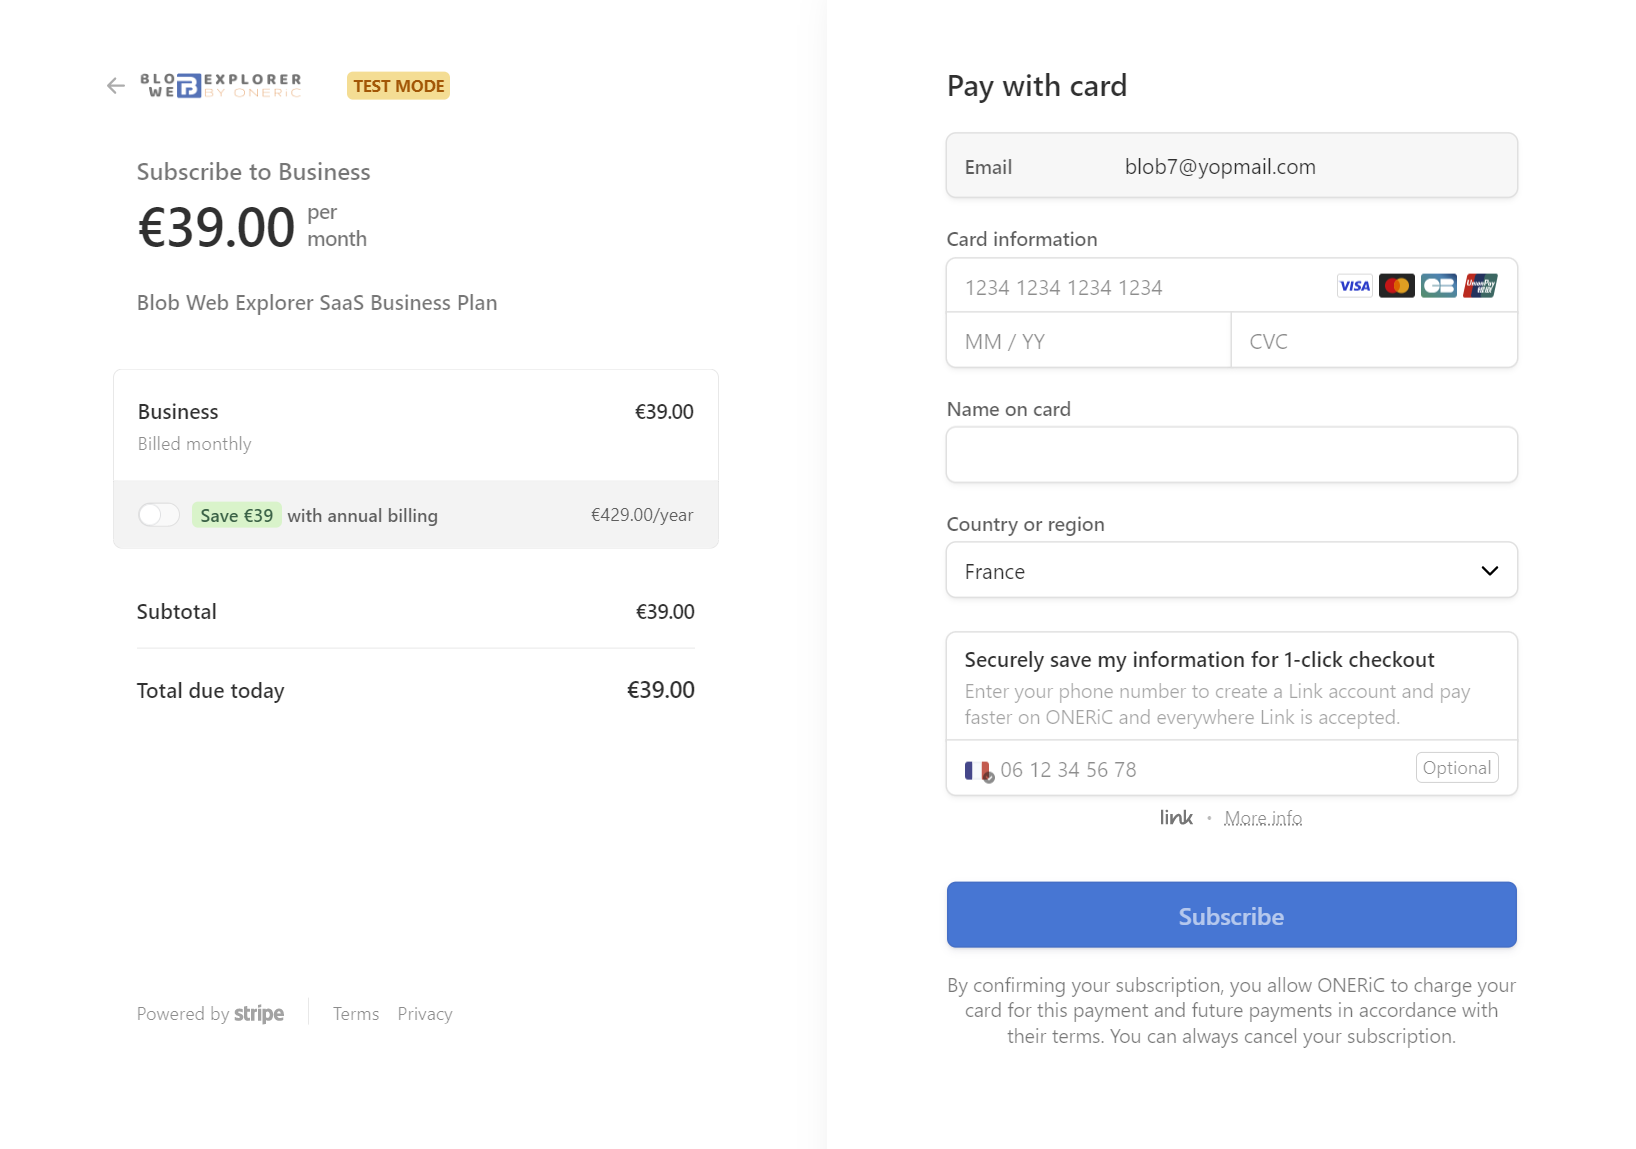
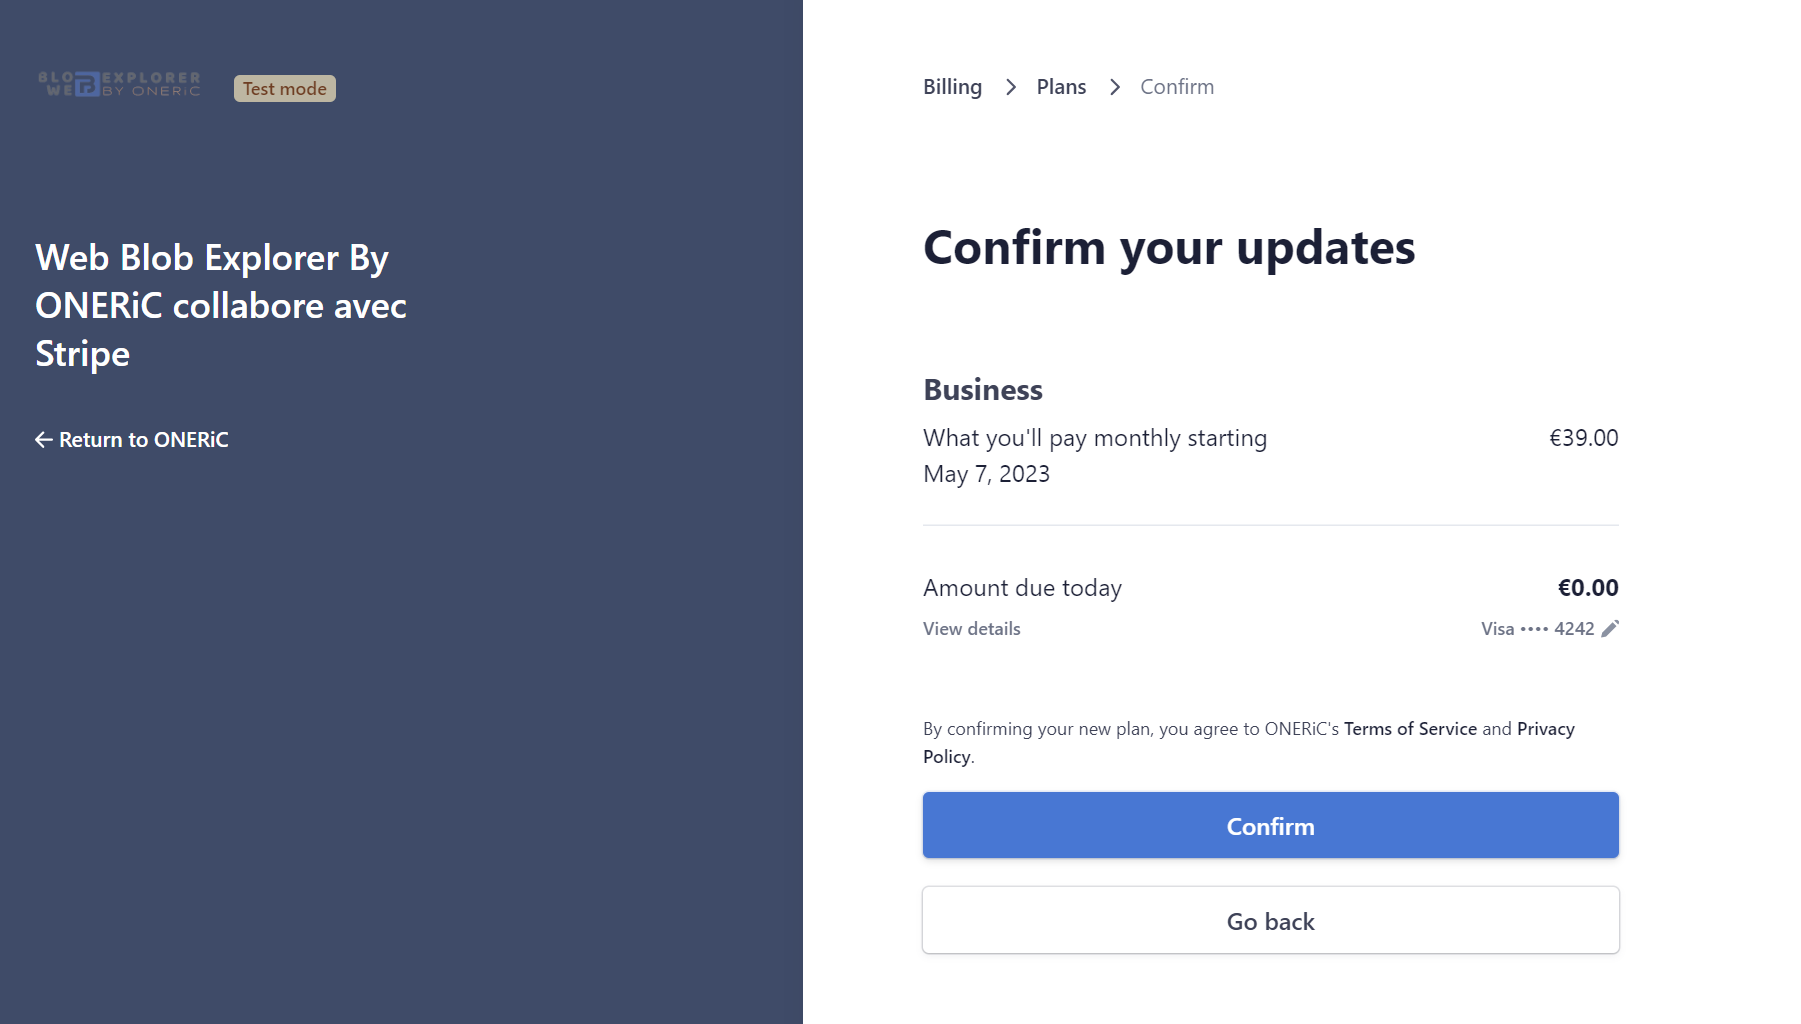
If you want to subscribe on one of our plans:
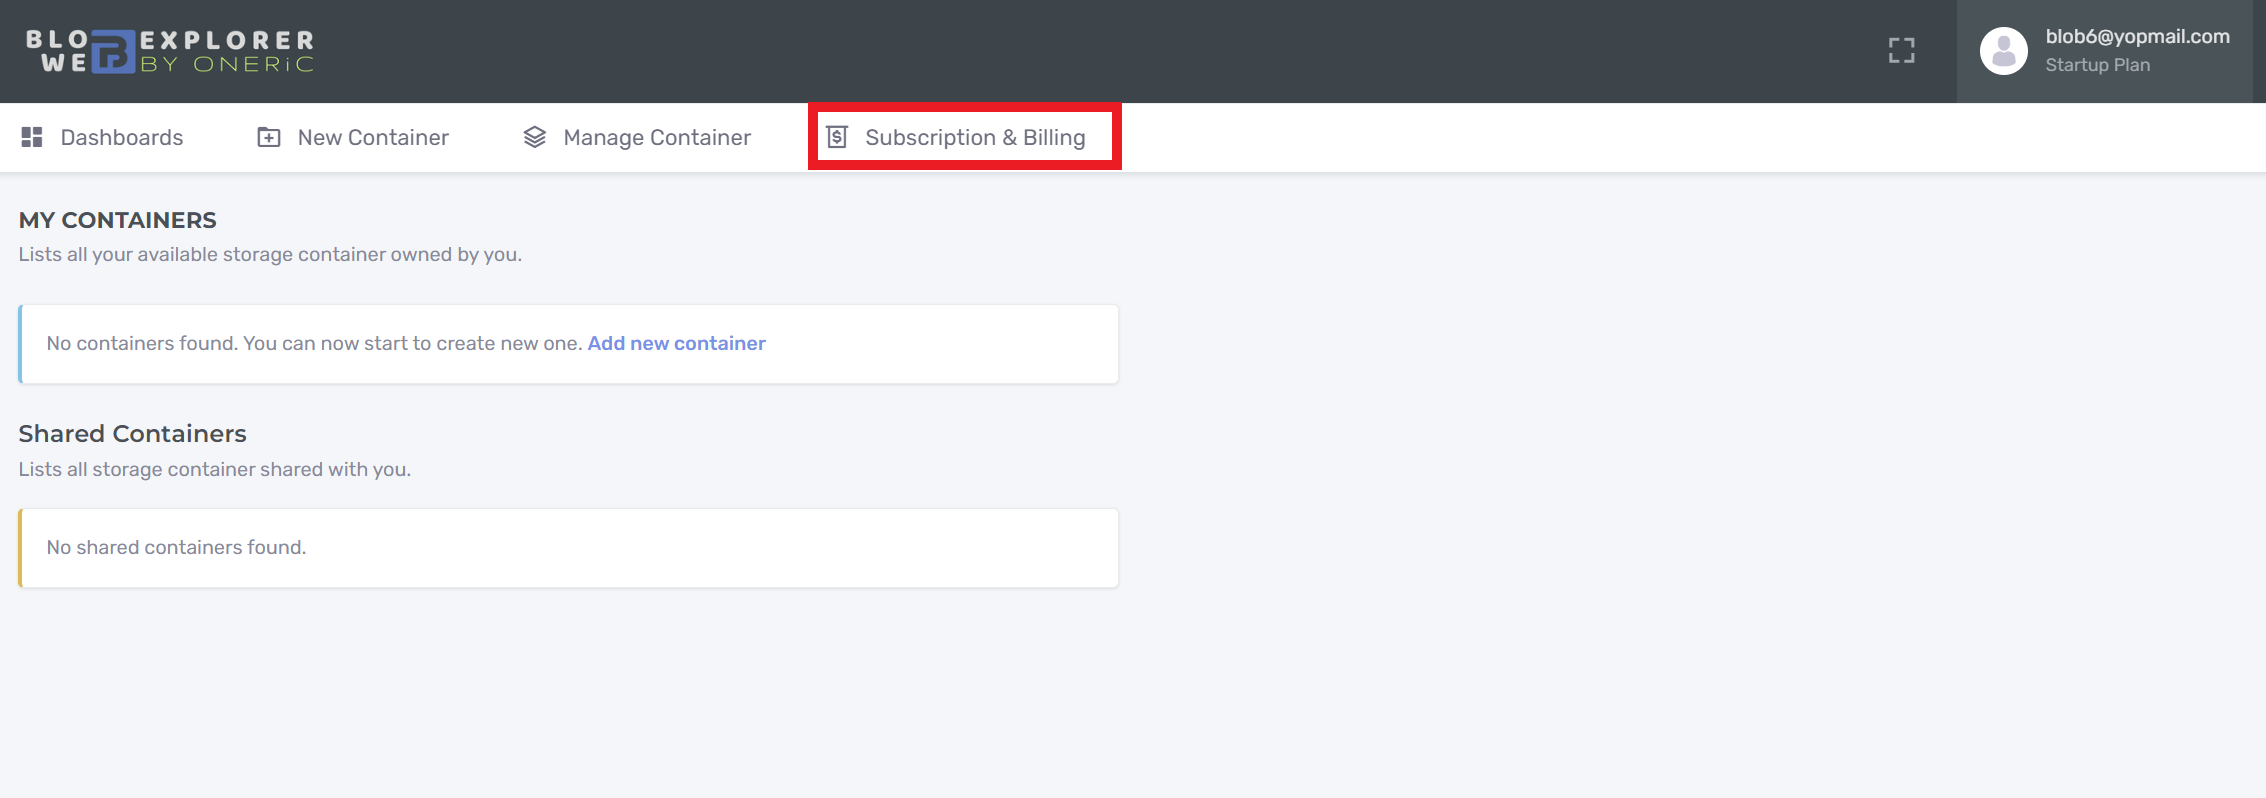
- Click on "Subscription & Billing" menu
- Choose your plan and click "Subscribe", you will be redirect to our payment partner Stripe.
- Fill your card information and your Country.
- Finally, click on Subscribe to validate your payment
- You will receive an email with payment detail: payment receipt and an invoice
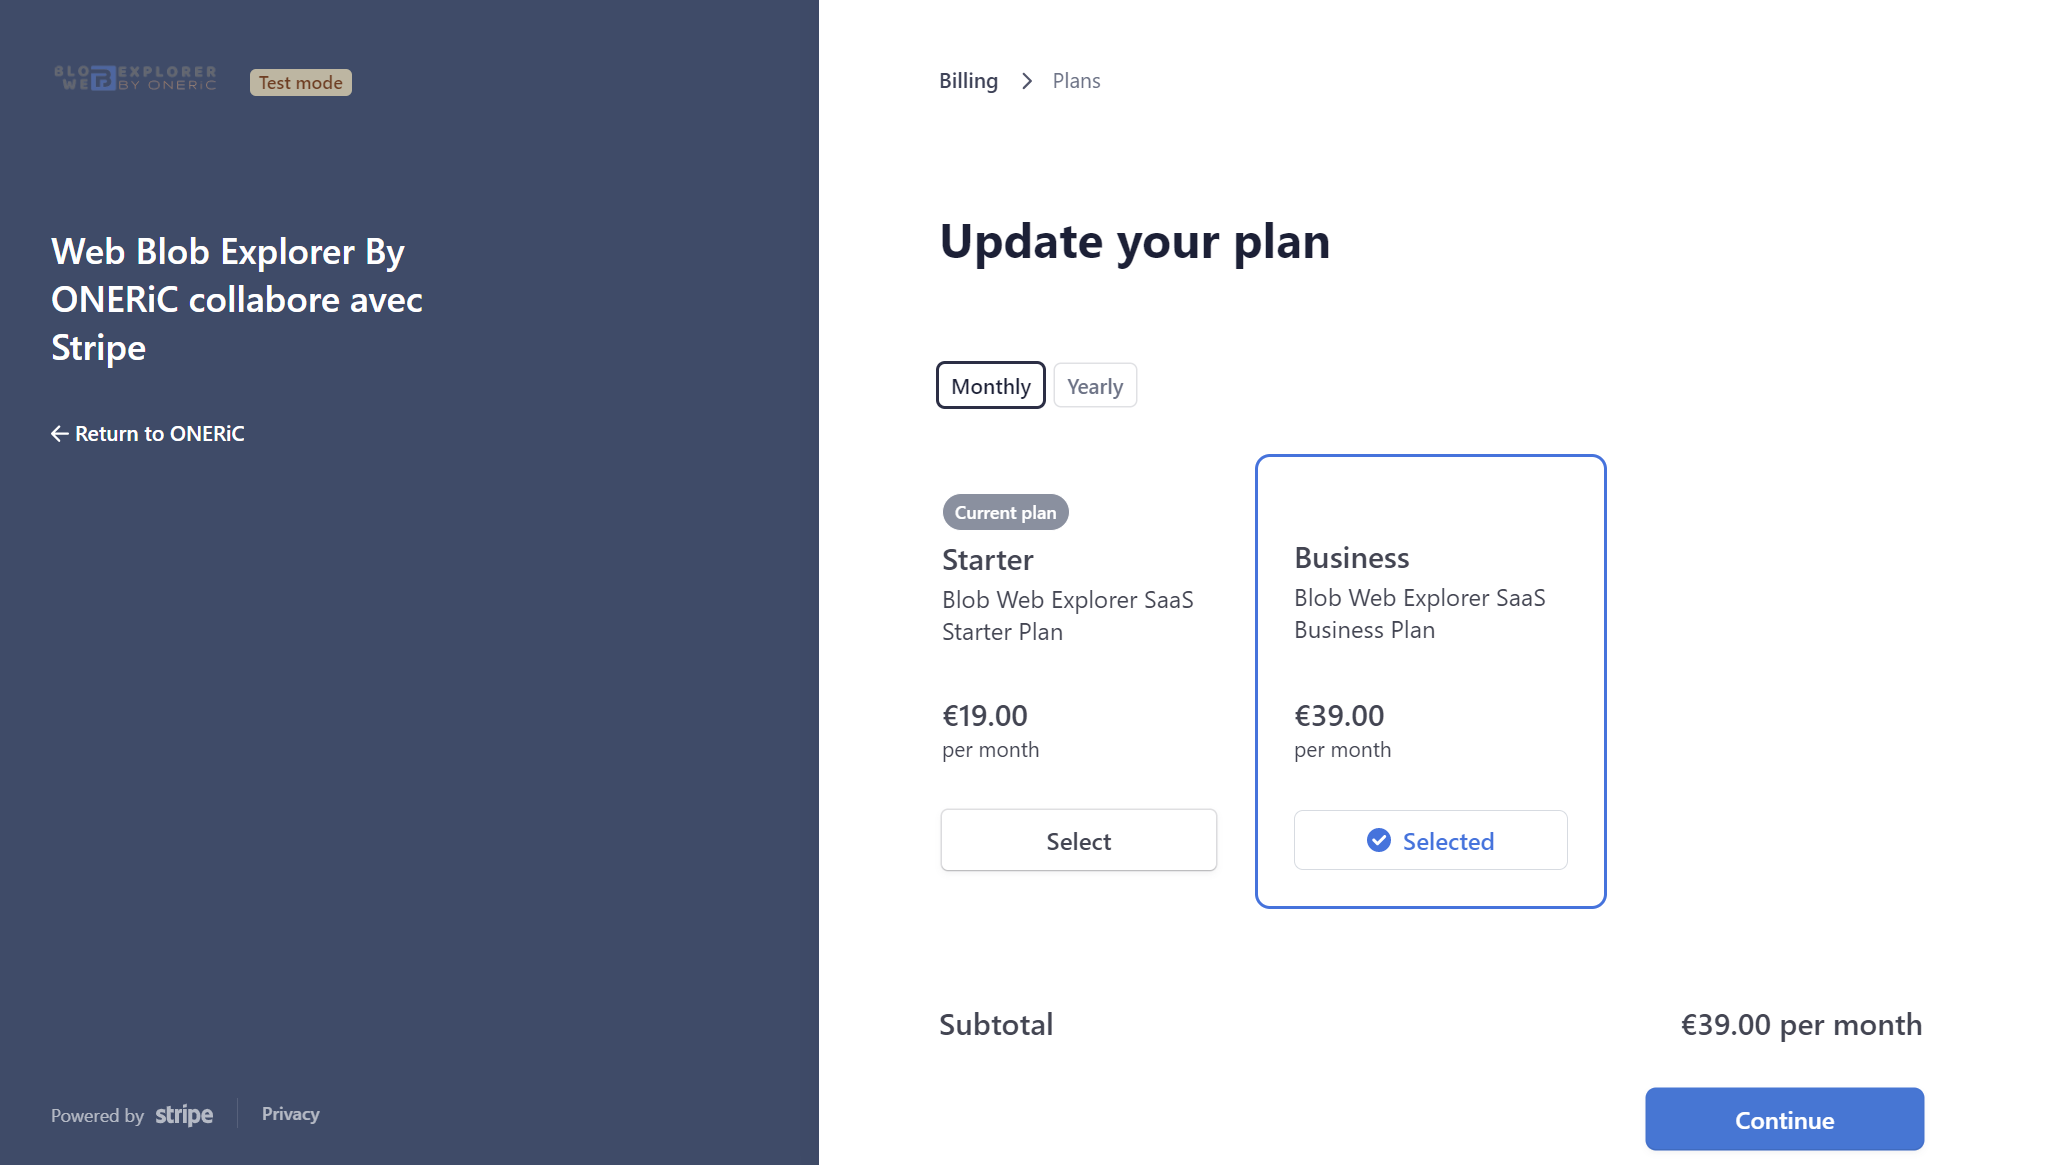
Update your Subscription
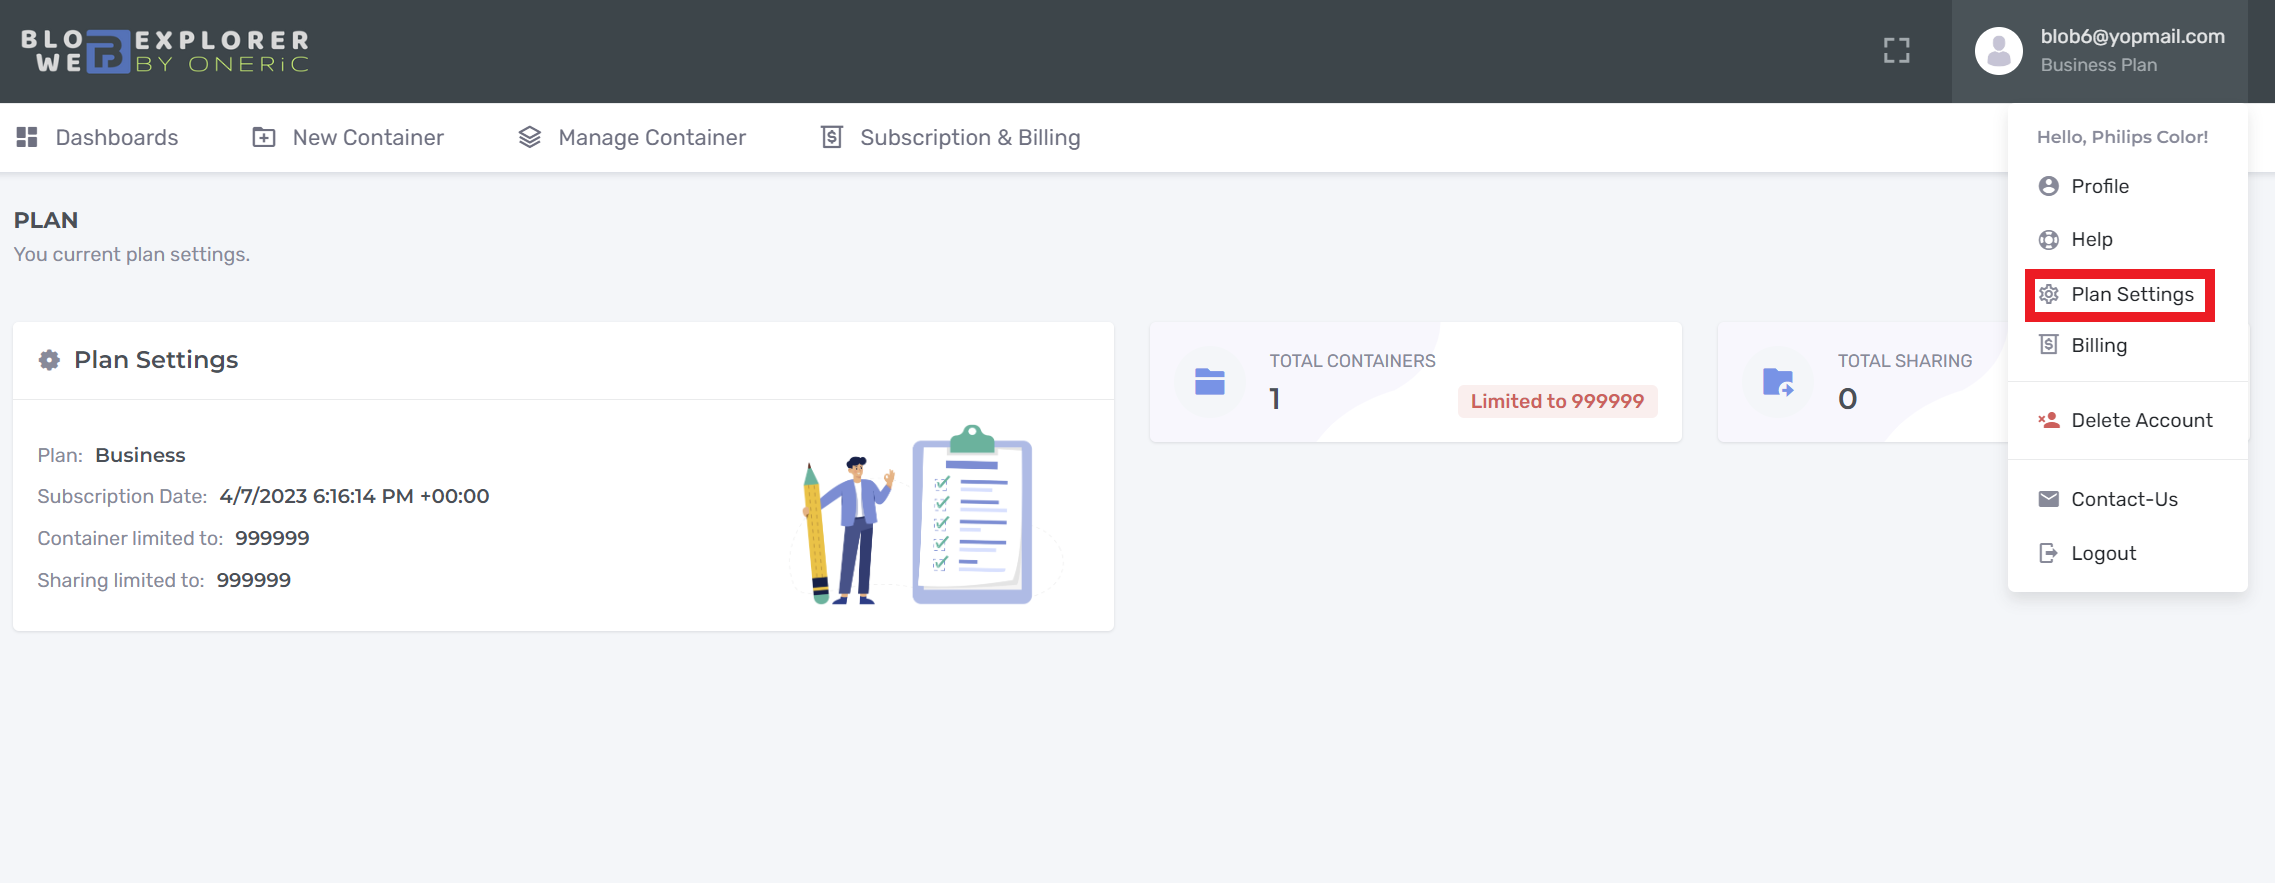
With the customer portal you can update your subscription by upgrading or downgrading your plan and also manage your billing.
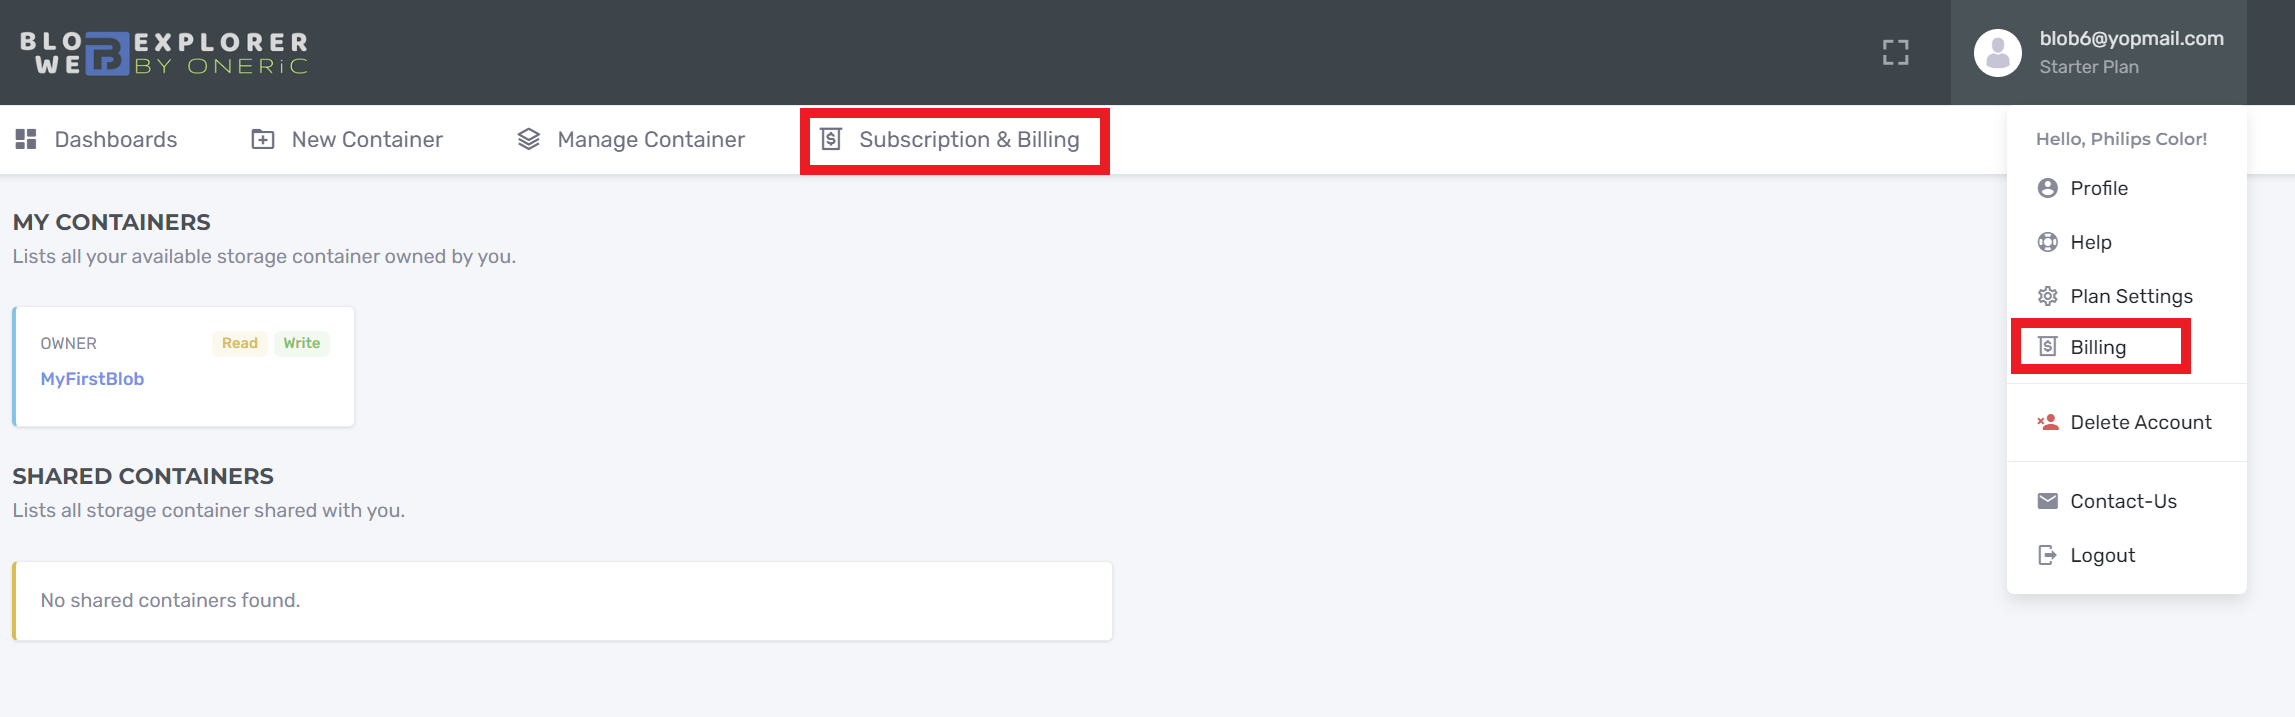
- After your first subscription, open "Subscription & Billing" from the main menu or "Billing" from your account menu.
- Click "Update plan", select your new plan, and confirm. Billing is prorated.
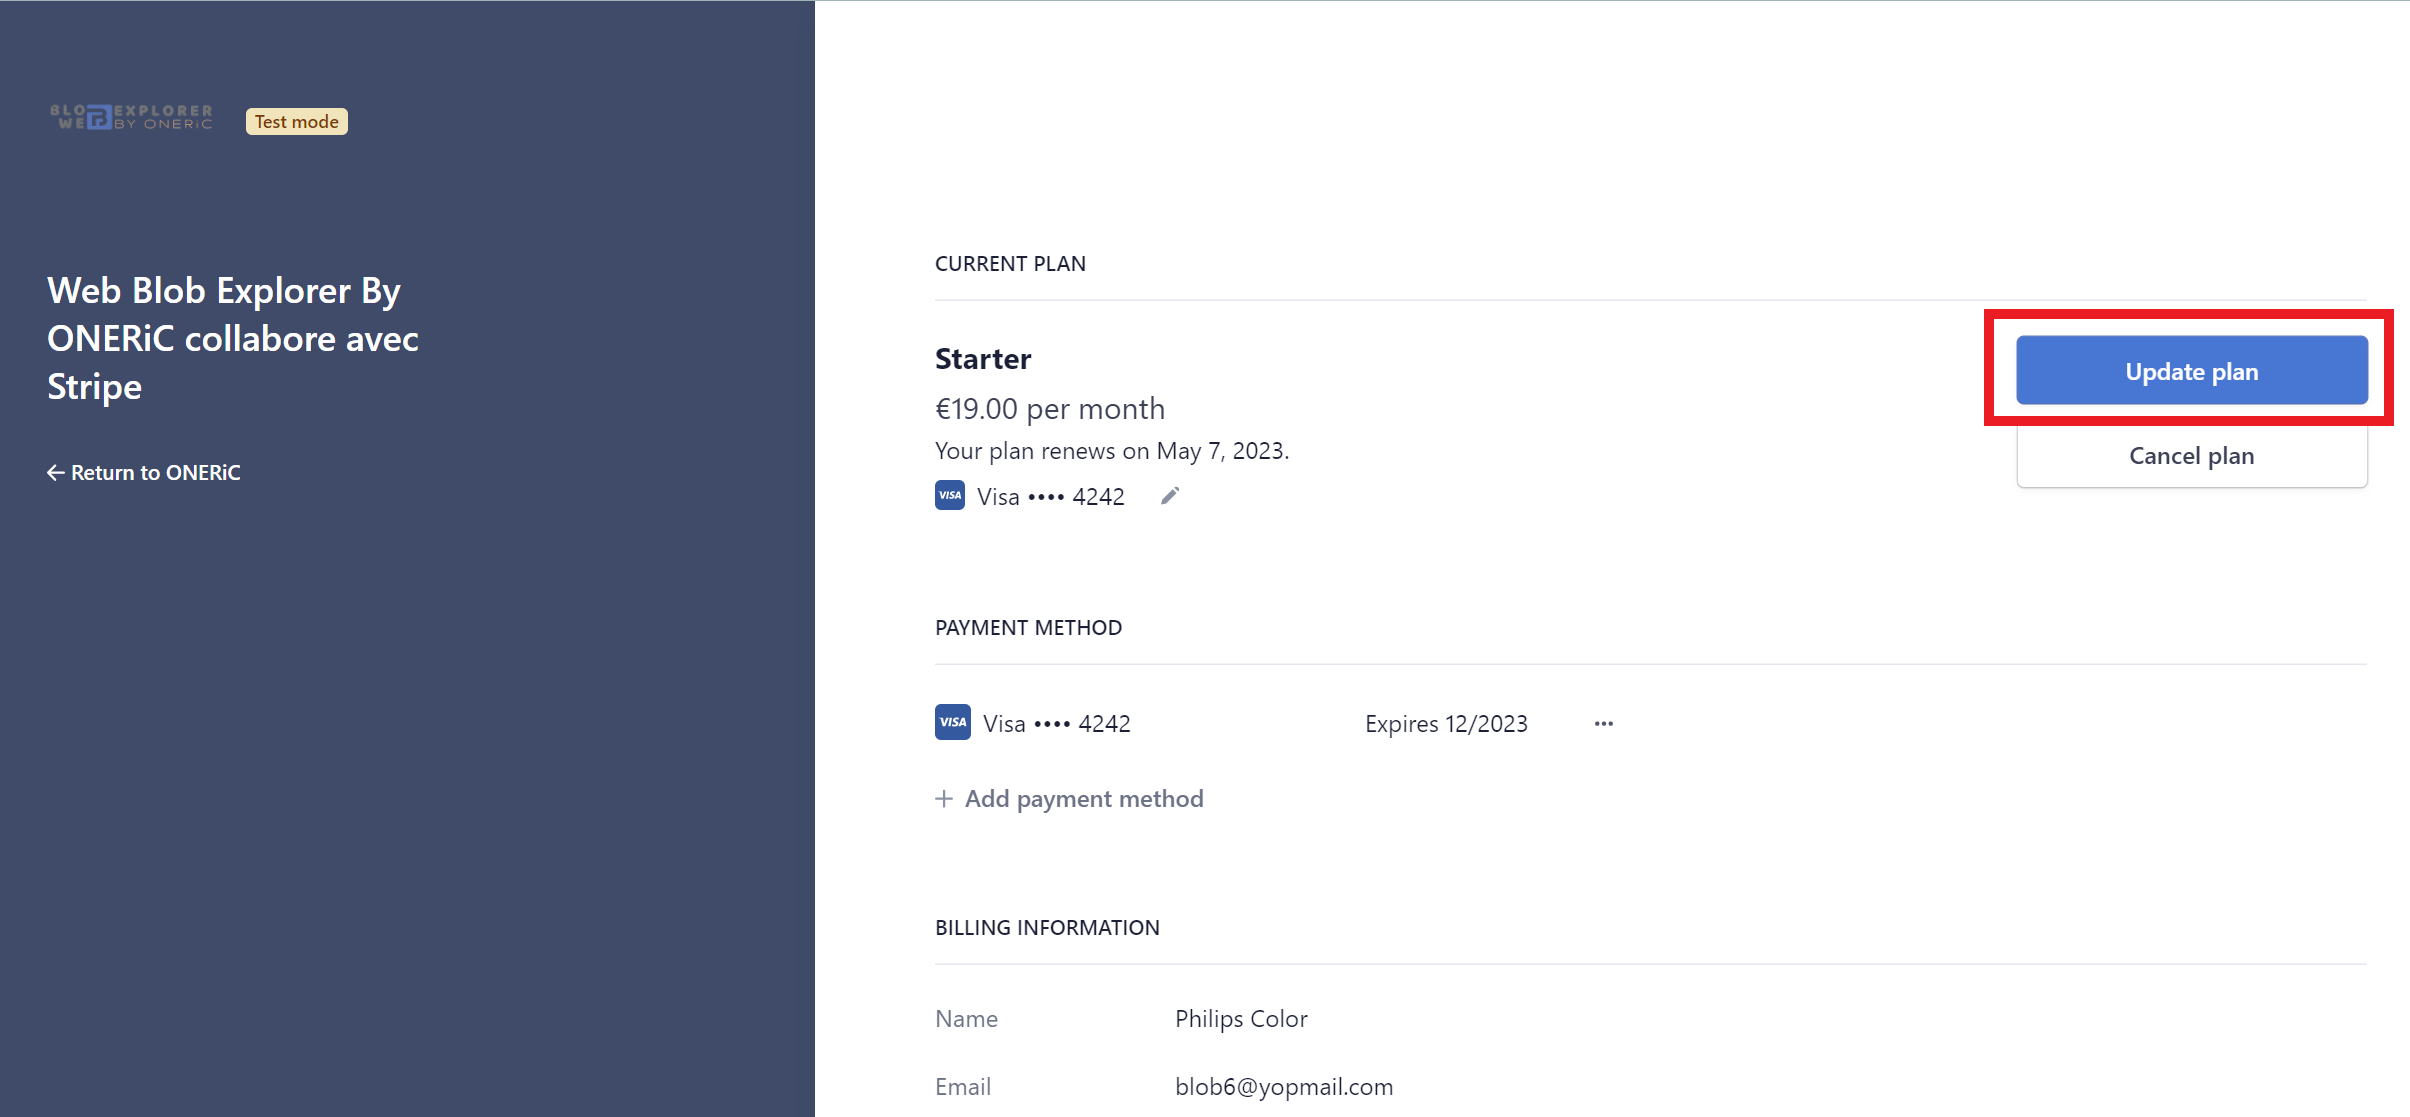
- You can review your current plan details in "Plan Settings" from your account menu.
Cancel Subscription
With the same portal you can cancel your subscription whenever you want.
Roles & Permissions
Access to each container is controlled by the following permission model:
| Permission | Browse & Search | Download | Upload & Edit | Share | Delete container | View logs |
|---|---|---|---|---|---|---|
| Owner | ✓ | ✓ | ✓ | ✓ | ✓ | ✓ |
| Write | ✓ | ✓ | ✓ | ✗ | ✗ | ✗ |
| Read | ✓ | ✓ | ✗ | ✗ | ✗ | ✗ |
Important: The share permission always takes priority over the user role. A user shared with Read access can only read that container — even if they are an administrator in an enterprise deployment.
Ownership belongs exclusively to the user who added the container. It is never transferred via sharing.
Activity Logs
Every operation performed on your containers is automatically recorded: uploads, downloads, deletions, renames, moves and sharing changes.
Each log entry includes:
- User identity (name and email)
- Action performed
- File or folder name
- Date and time
- IP address
To view the logs, click the Logs icon next to your container in the dashboard.
Activity logs are accessible only to the Owner of the container.
Billing
You can find and download all your invoice history on customer portal.

Frequently Asked Questions
Do I need an Azure account?
You need an existing Azure Storage Account to connect a container. BlobExplorer connects to your account — it does not create one for you. You only need a Microsoft account to sign in to BlobExplorer.
Are my files private?
Yes. Files are stored in your own Azure Storage Account. BlobExplorer never copies your data. No other user can access your containers unless you explicitly share them.
What file types are supported?
All file types. BlobExplorer is storage-agnostic and handles any file you upload.
What happens if I upload a file with the same name?
The existing file is overwritten. There is no versioning. Rename the file before uploading if you want to keep both versions.
Can a shared user share the container with others?
No. Only the container owner can manage sharing.
Can a shared user delete the container?
No. Only the owner can delete a container, regardless of the share permission level.
I am an admin in my organization — do I have full access to all containers?
In an enterprise (dedicated) deployment, admins have full access to containers not explicitly shared with them. However, if a container is shared with an admin using Read permission, the share takes priority — the admin can only read that container.
How do I delete my account?
Go to Account Settings → Delete Account. This removes your profile and all containers you own.
I cannot sign in — what should I do?
Make sure you are using the Microsoft account you registered with. If the problem persists, contact us via the Contact Page.
Support
If this documentation does not fully answer your question, contact us through the Contact Page.
Support hours: Monday to Friday (GMT +2).
Response time: usually within 12 to 24 business hours. In rare cases, it can take up to 48 business hours (holiday periods may take longer).
Changelog
See what's new added, changed, fixed, improved or updated in the latest versions.
Version 3.0 (April, 2026)
- Added Fine-grained permission model per container (Read / Write / Owner)
- Added Activity logs per container with full audit trail
- Added Enterprise deployment mode with role-based access (Admin / Contributor / Reader)
- Added Secure thumbnail preview (no SAS URLs exposed to the browser)
- Updated External upload activation now depends on upload configuration flags, not on Platinum mode
- Fixed Free plan Link Container now shows the limit prompt on additional submit attempts instead of blocking the page on initial load
- Updated Sharing recipient directory suggestions are now enterprise-only; public plans use direct email entry
- Updated Share permissions always take priority over global roles
- Updated All file operations validated server-side
Version 2.0 (06 November, 2024)
- Added Support link container by SAS Url
- Fixed Empty folder created in Azure Storage Account GEN2
- Fixed Order container list by created date
Version 1.2 (08 May, 2023)
- Added Optimizing upload files
- Fixed Send email in contact us form
- Updated Packages to Latest version
Version 1.1 (17 April, 2023)
- Added Upload file size limit per plan
- Fixed Upload large file
Version 1.0 (26 March, 2023)
Initial Release